

A Guide to ADA Handicap Parking Space Requirements
Getting ADA handicap parking right is about more than just dodging fines—it’s about providing safe, dignified access for everyone. The rules might seem complicated at first, but they boil down to a few core principles: having the right number of spots, building them to the correct size, and marking them clearly.
If you own or manage a property with a parking lot, compliant accessible parking isn't optional. It's a fundamental requirement.
Your Blueprint for ADA Parking Compliance
Diving into the regulations for accessible parking can feel like trying to read a dense legal text. But the purpose behind it all is simple: make sure people with disabilities can get into a building just as easily as anyone else. A well-designed, compliant parking lot is the first step in that journey—it’s the welcome mat to your business.
Ignoring these standards isn't just a legal gamble; it creates a real barrier that shuts out a significant part of the community. For property owners and contractors, the smart move is to treat these rules as a blueprint from day one. Build accessibility into your project's foundation, don't just tack it on as an afterthought. It'll save you from expensive fixes and legal headaches later on.
The "Why" Behind the Rules
The Americans with Disabilities Act (ADA) of 1990 was a game-changer for public spaces, especially parking lots. It established clear rules to ensure people with disabilities weren't left behind. These aren't just arbitrary numbers; they're based on the real-world challenges faced by individuals who use wheelchairs, walkers, or other mobility aids and need extra space to safely get in and out of their vehicles.
The requirements scale with the size of your lot. For instance, a small lot with 1 to 25 total spots needs at least one accessible space, and it must be van-accessible. As the lot gets bigger, the number of required spaces increases.
Required Number of Accessible Parking Spaces by Lot Size
The ADA provides a clear formula to determine how many accessible spots you need. This table breaks down the minimums based on the total number of parking spaces in your lot.
| Total Spaces in Lot | Minimum Accessible Spaces Required | Minimum Van-Accessible Spaces Required |
|---|---|---|
| 1 to 25 | 1 | 1 |
| 26 to 50 | 2 | 1 |
| 51 to 75 | 3 | 1 |
| 76 to 100 | 4 | 1 |
| 101 to 150 | 5 | 1 |
| 151 to 200 | 6 | 1 |
| 201 to 300 | 7 | 2 |
| 301 to 400 | 8 | 2 |
| 401 to 500 | 9 | 2 |
| 501 to 1,000 | 2% of total spaces | 1 for every 6 accessible spaces |
| 1,001 and over | 20, plus 1 for each 100 over 1,000 | 1 for every 6 accessible spaces |
Remember, these are minimums. Local codes, especially in places like Houston, can sometimes have stricter requirements. Always check with your local jurisdiction.
The Four Pillars of Compliance
True compliance isn't just about having the right number of spaces. It’s a complete system where every component has to be correct. If one part is off, the entire space can be considered non-compliant.
Think of it like building a house—you need a solid foundation, sturdy walls, and a good roof. For ADA parking, the pillars are:
- The Right Count: Your total lot size determines the minimum number of standard and van-accessible spaces you must provide.
- Exact Dimensions: The parking stall and the adjacent access aisle have strict width and length requirements that can't be fudged.
- Proper Signage & Markings: Signs must be mounted at the right height with the correct symbols, and all pavement markings need to be bright and clear.
- A Clear Path: There must be a safe, unobstructed, and accessible route connecting the parking space to the building's entrance.
Getting these elements right from the start is always the most efficient path. If you’re managing a striping project, knowing these details isn't just helpful—it’s essential. You can explore more about keeping your property accessible in our complete guide to ADA compliance. Following this blueprint ensures your property is not only legally sound but truly welcoming to everyone.
Mastering Dimensions and Layouts
Once you’ve figured out how many accessible spots you need, the real work begins: laying them out with absolute precision. This isn't just about checking a box on a compliance form. Getting the dimensions right means creating a space that’s genuinely usable for someone who needs to deploy a wheelchair lift or ramp. Be off by just a few inches, and that well-intentioned parking space becomes unusable—and a major liability.
Think of an ADA-compliant parking space as a two-part system, not just a painted rectangle. You have the parking stall itself, and right next to it, the access aisle. That diagonally striped "no parking" zone is a critical component; it provides the room a person needs to safely get out of their vehicle and into a wheelchair. Without a properly sized and marked access aisle, the parking space itself simply isn't compliant.
Standard vs. Van-Accessible Space Dimensions
The ADA lays out two different types of accessible parking spaces: standard and van-accessible. As the name suggests, the van-accessible stalls give extra room for vehicles with side-mounted ramps or lifts, which need a lot more clearance.
Understanding these dimensions is the backbone of any compliant parking project. Standard accessible car spaces must be at least 8 feet wide and sit next to a 5-foot-wide access aisle. Van-accessible spaces offer a couple of options: you can either make the stall itself wider at 11 feet with a 5-foot aisle, or stick with an 8-foot stall but expand the access aisle to 8 feet.
It's not just about width, either. The ground itself has to be nearly level. All spaces and their adjoining aisles must have a slope no steeper than 1:48 (that's about a 2.08% grade) in any direction. This prevents wheelchairs from rolling away during transfers. You can find more of these nitty-gritty details in the official standards for safe parking layouts.
This diagram really helps visualize how these core components—the spaces, their dimensions, and the required signs—all have to work together.
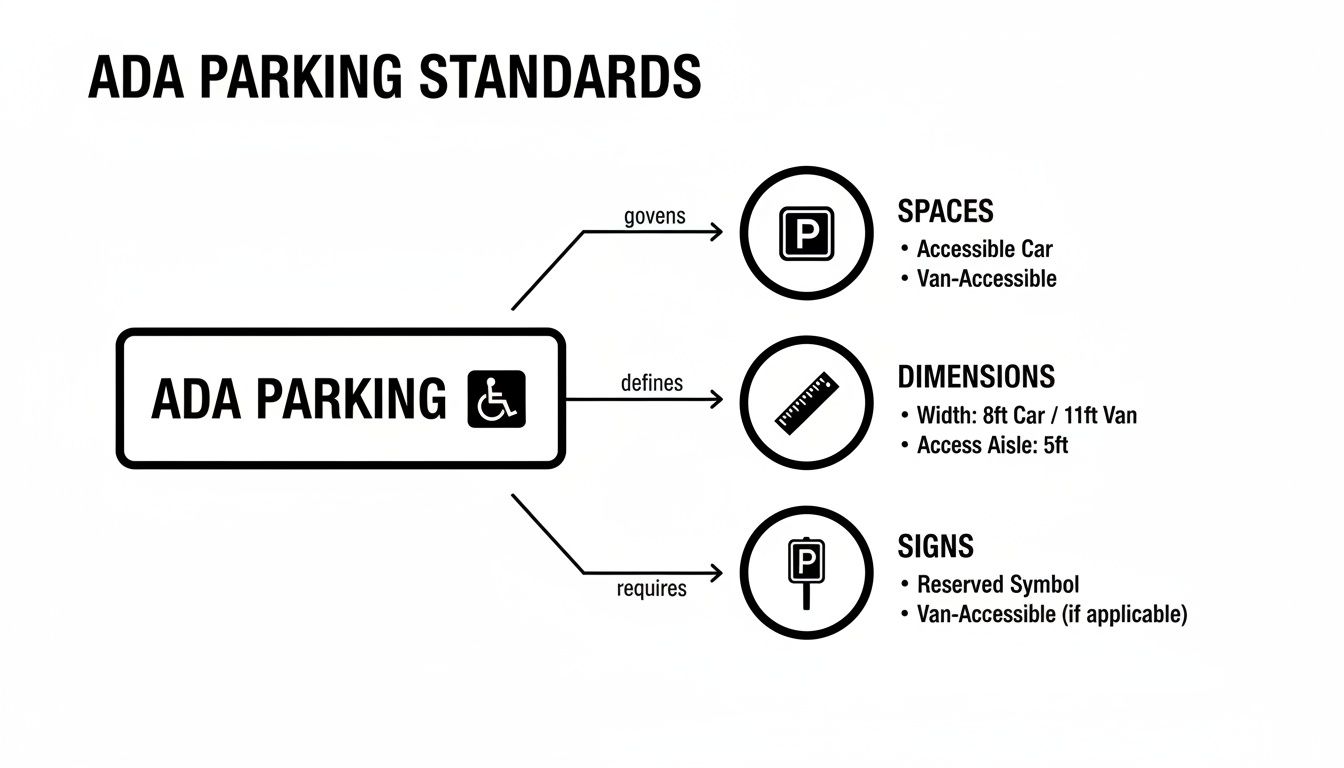
As you can see, a mistake in one area compromises the whole setup. Perfect compliance is about getting all three elements right, every time.
The Critical Role of the Access Aisle
The access aisle is easily the most misunderstood—and most frequently botched—part of ADA handicap parking requirements. It isn't just a buffer zone. It's a legally protected area that must be clearly marked with diagonal stripes to prevent anyone from parking in it.
One of the most common compliance failures we see is an obstructed or improperly sized access aisle. This single mistake can trigger hefty fines because it completely prevents a person with a mobility device from using the accessible space as intended.
The aisle has to be perfectly level with the parking stall, with no curbs, steps, or sudden drop-offs. It also needs to connect directly to an accessible route, creating a smooth, uninterrupted path from the vehicle all the way to the building's entrance.
For efficiency, two parking spaces are allowed to share a single access aisle. Just remember, when an aisle is shared, it has to be wide enough to serve the more demanding of the two spaces. In practice, this usually means designing it to meet van-accessible standards. For contractors and property managers, double-checking the access aisle's dimensions and markings is just as crucial as measuring the stall itself. That extra bit of diligence is what separates a successful project from a costly do-over.
Getting Signage and Surface Markings Right
You can have a parking space with perfect dimensions, but if it lacks the right visual cues, it’s not compliant. Think of signage and surface markings as the essential communication tools of your parking lot. They’re not just for show; they identify accessible spaces and guide users safely, making sure everything is clear, visible, and universally understood.
Consider signs and paint as the final, critical layer of your compliance strategy. They ensure a space is not only physically accessible but also easy to spot from a distance, even when other cars might block the view. Getting these details wrong can result in the same stiff penalties as having a stall that’s too narrow or an aisle that’s too small.
Essential Signage Requirements
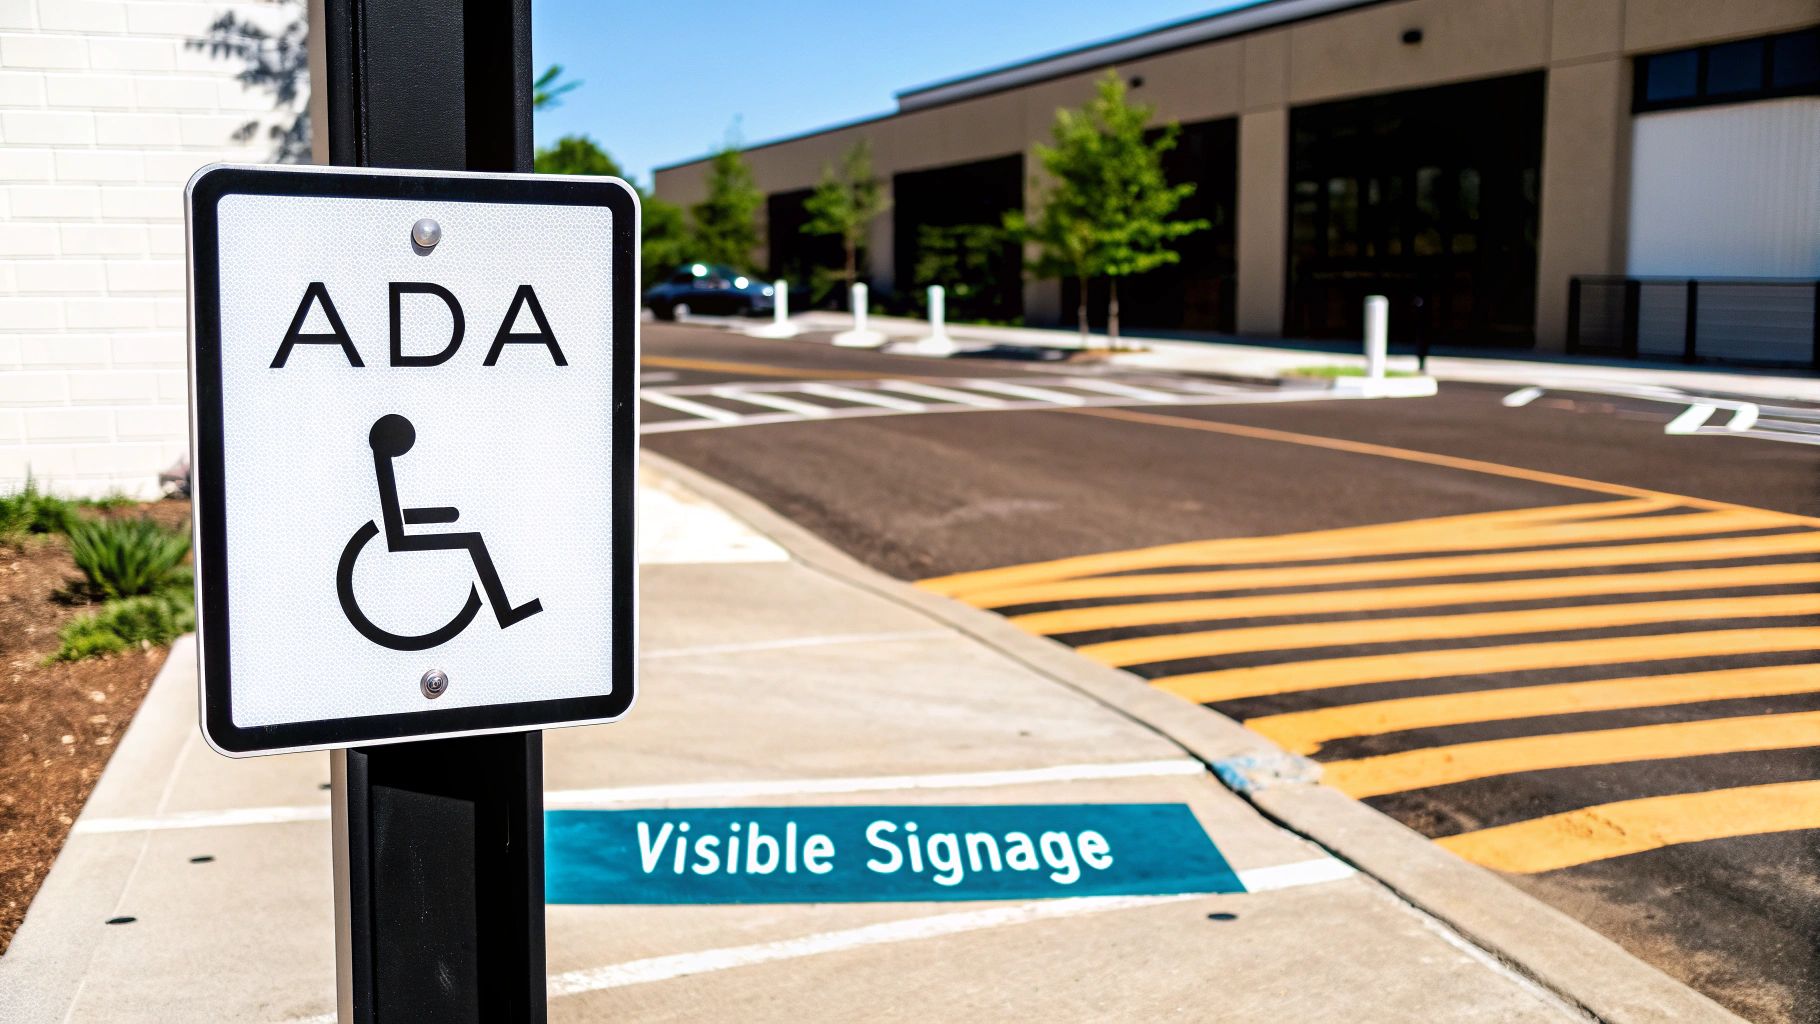
The most recognizable feature of any accessible spot is the sign with the International Symbol of Accessibility. This isn't optional—it's a mandatory part of every single designated stall. The sign itself also has to be placed just right to be effective.
One of the most important rules is its height. The bottom edge of the sign must be mounted at least 60 inches (5 feet) above the ground. This specific height isn't random; it ensures the sign is clearly visible over the hood of a parked car or SUV, preventing it from being accidentally hidden.
For van-accessible spaces, there’s an extra requirement. A "Van-Accessible" designation must be clearly posted on the sign, usually right below the main accessibility symbol. This helps people who need that extra-wide access aisle find the right spot quickly.
Pavement Markings and Surface Integrity
While the vertical sign grabs a driver's attention from afar, the markings painted on the pavement provide immediate, ground-level confirmation. These two elements work together to create a foolproof system.
- The International Symbol of Accessibility: This symbol needs to be painted on the surface of the parking stall. Although the ADA doesn't specify a color, blue and white are the universal standard everyone recognizes.
- Boundary Lines: The stall’s perimeter must be clearly defined with painted lines, usually white or yellow, marking out its full dimensions.
- Access Aisle Markings: The adjacent access aisle needs to be marked with diagonal hash marks, clearly showing that it's a no-parking zone. Stenciling "NO PARKING" within the aisle is also a widely adopted best practice.
The surface itself is a key part of the ADA handicap parking space requirements that is often overlooked. The ground must be firm, stable, and slip-resistant to provide a safe platform for wheelchair transfers, regardless of weather conditions.
Beyond just the paint, the physical condition of the surface is strictly regulated. The slope of both the parking space and the access aisle can’t exceed 1:48—that’s about a 2% grade—in any direction. This crucial detail prevents wheelchairs and other mobility devices from rolling away unexpectedly. It’s all about safety.
Getting these fine points right requires real precision. For anyone managing a large-scale project, knowing how to stripe parking lots correctly ensures both durability and compliance from day one.
In the end, proper signage and markings create a complete, cohesive system. The sign offers visibility from a distance, the pavement symbol confirms the spot’s purpose up close, and the striped aisle protects the critical maneuvering space. Each component is vital for creating a truly accessible environment that meets federal law.
Connecting the Dots: The Accessible Route
Getting the parking space right is a huge step, but it's only half the battle. A perfectly measured, marked, and signed stall doesn't do much good if the person using it can't actually get to your front door. This is where the accessible route comes in—it’s the protected pathway that bridges the gap between the vehicle and the building.
Think of it like this: the parking space is the starting point, but the accessible route is the journey itself. If that path is blocked by a high curb, broken up by cracked pavement, or cluttered with obstacles, the whole system fails. Your property isn't just inconvenient; it's out of compliance.

What Makes an Accessible Route Compliant?
An accessible route has to be a continuous, clear path that connects accessible parking spaces directly to an accessible entrance. It’s designed so that someone using a wheelchair, walker, or other mobility device can navigate it safely and without a struggle.
The ADA doesn't leave this to guesswork. The standards are very specific to ensure the journey is not just possible, but reasonably easy for everyone.
Here's what you need to get right:
- Minimum Clear Width: The path must be at least 36 inches wide at all times. This isn't just an average; it’s a constant minimum to ensure a wheelchair can pass through without issue.
- Stable and Slip-Resistant Surface: The ground has to be firm. Materials like loose gravel, sand, or wood chips are out—they can bog down a wheelchair, making movement nearly impossible.
- Keep it Level: Just like the parking stall, the route needs to be as flat as possible. The slope in the direction of travel (the running slope) can't be steeper than 1:20 (5%), and the side-to-side slope (the cross slope) must be less than 1:48 (2.08%).
Tackling Curbs with Proper Ramps
Curbs are easily the most common barrier that can instantly break an accessible route. A curb ramp is the solution, but just pouring a bit of concrete to make a slope won't cut it. It has to be designed and built with precision.
A compliant curb ramp is engineered for safety. It needs flared sides or returned curbs to guide users and prevent a wheelchair from tipping or someone from tripping. It's all about creating a smooth, predictable transition from the parking lot to the sidewalk.
An improperly built curb ramp is a major liability. If it's too steep or has abrupt edges, it not only violates ADA rules but also creates a genuine safety hazard for the people you’re trying to accommodate.
The ramp's slope is critical, typically capped at 1:12 (around 8.33%). It also needs level landings at the top and bottom, giving users a flat, stable area to stop, rest, or turn. This level of detail is what turns a major obstacle into a seamless part of the journey.
How to Audit Your Accessible Path
For property managers and contractors, the best way to ensure compliance is to walk the path yourself. Start at the access aisle of an accessible stall and follow the route all the way to the building’s main entrance.
Keep an eye out for these common failures:
- Obstructions: Is the 36-inch clear width blocked by anything? Look for trash cans, benches, bike racks, or even overgrown bushes.
- Surface Hazards: Are there potholes, wide cracks, or heaved concrete slabs that could catch a wheelchair's caster wheels?
- Abrupt Edges: Any vertical change over 1/4 inch must be beveled. A small, sudden lip in the concrete can be enough to stop a wheelchair cold.
- Faulty Ramps: Check every curb ramp. Is the slope gentle enough? Are the transitions smooth? Are there level landings?
Making sure this pathway is clear, stable, and correctly constructed is every bit as important as painting the lines for the parking space. It’s the final piece of the puzzle that ensures your property is truly accessible to all.
Navigating Local Texas Compliance
While the federal Americans with Disabilities Act (ADA) gives us the national baseline, it’s crucial to remember that it's just that—a baseline. States and even cities can, and often do, have their own accessibility rules that build upon federal law. For anyone managing or building property in the Lone Star State, that means you need to know the Texas Accessibility Standards (TAS) inside and out.
Think of it this way: the ADA sets the floor, not the ceiling. The TAS, which falls under the Texas Department of Licensing and Regulation (TDLR), can legally be stricter. Overlooking these state-specific details is a surefire way to fail inspections and face penalties, even if you’ve followed the federal ADA guidelines to the letter.
Understanding Texas Accessibility Standards
For the most part, the TAS and ADA are in sync. But there are a few key differences that can easily trip people up, especially when it comes to parking. The most common one I see is with signage. The ADA requires the well-known International Symbol of Accessibility, but Texas takes it a step further.
Here, you also need a second sign mounted right below it that warns against illegally parking. And the language isn't flexible. The sign must clearly state: "FINES UP TO $500." Leaving this out is an immediate red flag for a TDLR inspector and a simple mistake that can hold up your entire project.
A common and costly mistake in Texas is assuming that following federal ADA guidelines is enough. Projects that overlook TAS-specific rules, like the fine advisory on signs, often face state-level penalties and are forced into expensive rework to pass inspection.
Houston-Specific Challenges
Drilling down even further, working in a city like Houston presents its own practical issues. The weather here is tough on pavement. Between the blistering sun, thick humidity, and torrential downpours, your parking lot markings take a serious beating.
- Accelerated Paint Fading: That intense Texas sun just bakes the pigment out of traffic paint. A striping job that might look good for 24-36 months in a milder climate could fade into non-compliance in as little as 18 months here.
- Weather Damage: Heavy rains can easily get under poorly applied paint, causing it to chip and peel away long before its time. Proper surface prep is everything.
If you’re a property manager in the Houston area, you can’t just “set it and forget it.” You have to be proactive with inspections to make sure your markings stay crisp and visible. A faded blue space or barely-there access aisle lines are all it takes to get you flagged for a violation.
Older Properties and Grandfather Clauses
Now for one of the biggest myths in property management: the "grandfather clause." Many owners of older buildings believe they’re exempt from modern accessibility standards. That’s a dangerous assumption.
While certain historical building elements might have some protections, that grace almost never extends to your parking lot when you make changes. The moment you alter your parking area—whether it’s a simple restripe, a sealcoat, or a full resurfacing—you trigger the requirement to bring everything up to the current TAS and ADA codes. That means you have to ensure the correct number of spaces, proper dimensions, compliant signage, and accessible routes. What started as routine maintenance can quickly become a massive compliance headache if you're not prepared.
Your Essential ADA Compliance Checklist
Knowing the ADA rules is one thing, but putting them into practice on actual asphalt is where the real work begins. For contractors and property managers, a solid checklist isn't just helpful—it's your best defense against expensive mistakes and compliance headaches. Think of it as a step-by-step game plan that turns abstract regulations into a clear, manageable project.
Let's walk through the process, from the initial site survey to the final sign-off, ensuring every detail is nailed down.
Phase 1: Initial Site Audit and Planning
Before you even think about firing up the striper, you need to know exactly what you're working with. This first phase is all about investigation and strategy. You're looking for existing problems and creating a blueprint to fix them according to both federal and local codes.
- Do the Math: First things first, get a hard count of the total parking spaces on the property. That number is your starting point for calculating the minimum number of accessible and van-accessible spots required by the ADA.
- Break Out the Tape Measure: Get precise measurements of any existing accessible stalls and their access aisles. How do they stack up against the rules? Remember the key numbers: 8 feet wide for standard stalls, 11 feet for van stalls (or an 8-foot stall with an 8-foot aisle), and a 5-foot minimum for standard access aisles.
- Check the Signs: Take a close look at every accessible parking sign. Is the bottom edge at least 60 inches off the ground? Is the "Van-Accessible" sign there where it needs to be? And since we're in Texas, don't forget to check for that mandatory fine warning sign.
- Walk the Path: Trace the accessible route from the parking space all the way to the building's entrance. The path must be at least 36 inches wide at all points, completely clear of obstacles, and have a smooth, stable surface without any dangerous cracks or slopes.
Phase 2: Preparation and Execution
Once your plan is locked in, it's time to make it happen. Success in this phase comes down to proper prep work and using the right materials. You’re not just aiming for compliance; you’re aiming for durability, especially in a tough climate like Houston’s.
You can't skip the prep work. A thorough power washing to blast away dirt, oil, and peeling paint is absolutely critical. This step ensures your new paint actually sticks to the asphalt, saving you from having to do it all over again in a year.
Pro Tip: Try to schedule striping work during the property's quietest times, like overnight or on a weekend. This keeps disruptions to a minimum for tenants and customers. A little heads-up communication goes a long way in making sure the work area is clear of vehicles when your crew arrives.
The paint you choose matters. For Houston's weather, with its blazing sun and torrential downpours, you need a high-quality, resilient traffic paint. This isn't just a line on the ground; it's an investment in keeping your lot compliant and looking sharp for years to come.
Phase 3: Final Inspection and Sign-Off
The paint is dry and the signs are up, but you're not done yet. A final, meticulous walkthrough is your last line of defense. This is your chance to catch any small errors before you call the job complete.
- Verify All Dimensions: Get that tape measure out one more time. Double-check the width and length of every stall and access aisle to ensure they match the plan perfectly.
- Confirm Sign Placement: Eyeball every sign again. Is the height right? Is the location correct? No exceptions.
- Document Everything: Take clear photos of the finished work. Get shots that include a tape measure showing the correct dimensions. This visual proof is invaluable for your records and can be a lifesaver if your compliance is ever questioned.
Following this systematic process ensures your property isn't just meeting the letter of the law but is genuinely accessible and welcoming. If you're planning a project, getting a handle on the factors that influence the cost to restripe a parking lot will help you budget for a professional and fully compliant outcome.
Answering Your Top ADA Parking Questions
When you're dealing with the nitty-gritty of ADA parking rules, a few key questions always seem to pop up. It’s completely understandable—getting these details right is crucial for avoiding compliance headaches and ensuring genuine accessibility. Let's walk through some of the most common questions we get from property owners and contractors out in the field.
How Often Should I Re-Stripe My ADA Parking Spaces?
There's no hard-and-fast federal deadline, but ADA compliance is a 24/7 requirement. Here in Houston, the intense sun and heavy rain can wreak havoc on traffic paint, often causing it to fade beyond recognition in just 18 to 24 months. The moment those markings become unclear, your property is officially out of compliance.
Think of it this way: your parking lot's markings are a form of communication. If they're too faded to read, the message is lost. A good rule of thumb is to inspect your entire lot at least twice a year. If any lines, symbols, or access aisle markings look weak, it’s time to schedule a re-stripe. And remember, if you're doing any major work like resurfacing or sealcoating, the law requires you to update your entire parking layout to meet the latest ADA standards.
What’s the Most Common ADA Parking Mistake People Make?
Hands down, the single biggest and most costly mistake we see involves the access aisle. It's a constant issue. We frequently find aisles that are too narrow, are missing the required diagonal hash marks, or have become a dumping ground for shopping carts, trash cans, or even other vehicles. This one error makes the accessible space next to it completely useless and can lead to hefty fines.
A close second is incorrect signage. This usually means the sign is mounted too low—it has to be at least 60 inches from the ground to the bottom of the sign—or the "Van-Accessible" designation is missing where it's needed. These might seem like small details, but in the eyes of an inspector, they are major compliance failures.
Do I Really Need an Accessible Space for a Small Lot?
Yes, almost certainly. The rules apply to nearly every parking lot, no matter how small. If you have even 1 to 25 parking spots, you're required to have at least one accessible space.
It's critical to remember that this single space must be van-accessible. This means it needs the wider dimensions and access aisle required for vehicles with ramps or lifts.
Exemptions for small lots are incredibly rare. The safest and smartest approach for any property owner is to assume compliance is mandatory.
Can I Put the Accessible Spots Anywhere I Want?
No, their placement is very specific and deliberate. ADA handicap parking space requirements are clear: accessible spots must be on the shortest possible accessible route to the building’s main entrance. The entire point is to minimize how far a person with mobility challenges has to travel.
If your building has more than one accessible entrance, you should distribute the accessible parking spaces among them. This ensures people have convenient options no matter which entrance they need to use, promoting true, equitable access across your entire property. It's a key part of thoughtful, compliant design.
Making sure your property checks all the boxes for federal and local regulations can feel overwhelming, but you don’t have to figure it out alone. For expert advice and professional implementation of all ADA requirements, trust the team at Houston Parking Lot Striping. Contact us today for a free estimate and ensure your property is safe, accessible, and compliant.