

Paving and Sealcoating: A Practical Guide for Property Managers
When you're managing a commercial property, that first impression starts the moment a customer turns into your parking lot. Is it clean, smooth, and welcoming? Or is it a patchwork of cracks and potholes that screams neglect?
Believe it or not, a recent study showed that 64% of customers have decided against visiting a business simply because of its poor exterior appearance. Your asphalt is a huge part of that curb appeal. To manage it effectively, you need to know the two most important tools in your arsenal: paving and sealcoating.
They might sound similar, but they serve completely different purposes. Think of them as two specialists on the same team—one is a builder, the other a protector. Mistaking one for the other is a common and costly mistake.
Understanding the Core Difference in Pavement Care
Let's get straight to the point. Paving is a construction project that builds a new asphalt surface. Sealcoating, on the other hand, is a maintenance task that preserves an existing one. They aren’t interchangeable; they’re two distinct solutions for two different stages of your pavement’s life.
Paving is Construction
When we talk about paving, we’re talking about a major overhaul. This is the heavy-duty solution for asphalt that’s at the end of its rope. The process involves bringing in heavy machinery to either lay a brand-new surface or, more commonly, tear out and completely replace an old one that's failing.
You’d turn to paving when your lot is plagued by deep, structural problems—things like widespread "alligator" cracking, foundation failure, or potholes that are more like craters. It's the only real fix for asphalt that has truly given up.
Paving is the right call for:
- Brand-new properties needing their first parking lot.
- Older asphalt that has hit its 15-20 year life expectancy.
- Lots where the base layer has failed, making simple patches a waste of money.
This is a significant capital investment, no question. But when your pavement's structural integrity is gone, paving is the only way to hit the reset button and get a fresh start.
Sealcoating is Preservation
Sealcoating is your proactive defense strategy. It's a preventative maintenance procedure where a protective liquid sealant is applied over an existing asphalt surface that is still in good structural shape.
This thin layer adds zero structural strength. Its job is purely protective.
Think of sealcoating as high-performance sunscreen for your parking lot. It forms a tough, durable barrier against the elements that want to destroy your asphalt: UV radiation, water, and chemical spills from vehicles.
Without that protective layer, the sun's rays oxidize the asphalt, making it brittle and prone to cracks. Water seeps into tiny voids, freezes, expands, and turns small problems into big ones. Sealcoating stops all that in its tracks. A fresh coat every 2-3 years is a small maintenance expense that can dramatically extend the life of your pavement, pushing that expensive paving project years down the road.
To make this crystal clear, here is a simple breakdown of the two services.
At a Glance: Paving vs. Sealcoating
This table gives a high-level summary of the fundamental differences between asphalt paving and sealcoating.
| Attribute | Asphalt Paving | Asphalt Sealcoating |
|---|---|---|
| Primary Goal | Structural Construction | Surface Preservation |
| Analogy | Building a new house | Painting the house |
| When to Use | Severe cracks, potholes, base failure | Faded color, hairline cracks, routine care |
| Cost | High (Capital Expense) | Low (Maintenance Expense) |
| Lifespan Impact | Restarts the clock (15-20 years) | Extends existing life (by years) |
Understanding this distinction is the key to a smart, cost-effective pavement management plan. Paving and sealcoating aren’t an either/or choice. They are partners in a long-term strategy to keep your property safe, professional, and profitable.
The Asphalt Paving Process From Subgrade to Surface
When you look at a freshly paved parking lot, it’s easy to think it's just a simple layer of blacktop. But what you see is only the final step of a complex construction project. A truly durable asphalt surface is built in layers, starting from the ground up, and every single step is critical to its long-term survival.
It all starts with the dirt underneath, what we in the business call the subgrade. Think of it as the foundation of your house. If you build on shaky ground, it doesn't matter how well you build the rest of the structure—it’s destined to fail.
Building a Stable Foundation
A reputable paving crew won’t just dump asphalt on the existing ground. Their first job is to prepare the subgrade by grading the soil to ensure water drains properly, a step that prevents pooling and water damage down the line. Then, they bring in heavy compaction rollers to create a dense, stable base.
This isn't a step you can rush. Poorly compacted soil will inevitably shift and settle, leading to the weak spots that quickly turn into potholes and the dreaded "alligator" cracks. Here in the Houston area, our clay-heavy soil often requires extra work, like soil stabilization, where additives such as lime or cement are mixed in to add strength and control moisture.
The strength of your finished asphalt surface is directly tied to the stability of its subgrade. Studies show that a poorly compacted subgrade can reduce the lifespan of pavement by as much as 50%, making proper preparation the most important phase of any paving project.
Once the subgrade is solid and graded correctly, it's time for the next layer: the aggregate base course.
The Load-Bearing Layer
This is a layer of crushed stone, usually several inches thick, spread evenly over the subgrade. Its job is to be the pavement’s workhorse. The aggregate base is what bears the brunt of vehicle weight, distributing the load across a wide area to protect the soil underneath.
Just like the subgrade, this stone layer has to be graded and compacted meticulously. Doing it right creates a strong, interlocking structure that’s rigid yet permeable enough to let moisture drain through. Skimping on the thickness or compaction of this layer causes the pavement to flex under traffic, which is a fast track to fatigue cracking and structural failure.
The flowchart below shows just how different this multi-stage construction is from a simple maintenance application like sealcoating.
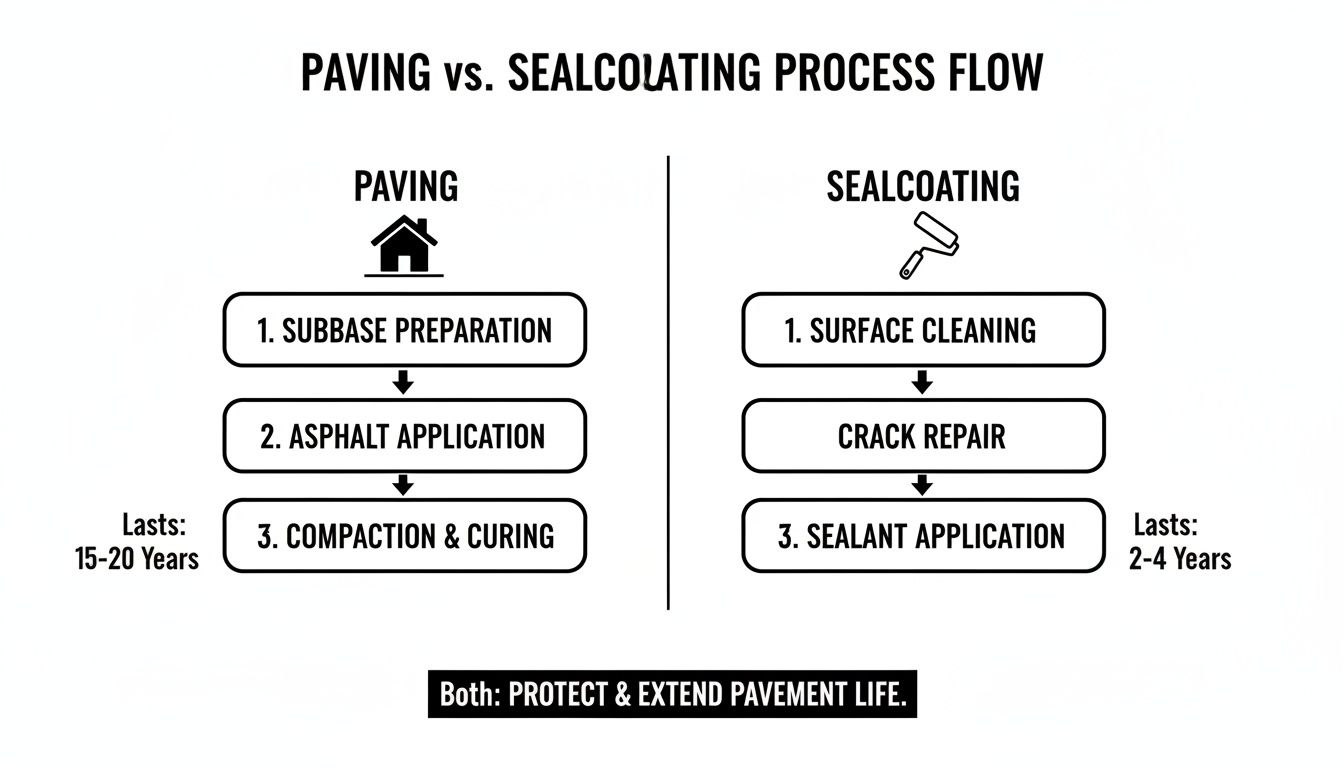
As you can see, paving is a bottom-up build, whereas sealcoating is a top-down protective measure.
Laying the Hot Mix Asphalt
With a solid foundation in place, we can finally bring in the asphalt. A professional job always uses hot mix asphalt (HMA), which arrives on-site at a blistering 275-325°F. It’s typically applied in two separate courses for maximum strength and a smooth finish.
- The Binder Course: This is the first and thicker layer of asphalt, applied right over the stone base. It’s made with larger aggregates to give the pavement its core strength and stability.
- The Surface Course: This top layer is what you see and drive on. It uses a finer aggregate mix to create a smooth, dense, and weather-resistant finish.
A paving machine lays down the hot asphalt to a precise, uniform thickness. Right behind it, a team with heavy rollers compacts the material while it's still hot. This final compaction is what forces the asphalt particles to bind together, squeezing out air pockets and creating the dense, durable surface that can handle years of traffic and weather.
The Art of Professional Sealcoating
If paving is the major surgery that builds your parking lot, think of sealcoating as the essential, preventative care that keeps it healthy. It’s a common misconception that sealcoating is just a cosmetic touch-up—like painting the lot black. In reality, it's a critical preservation process that shields your asphalt from the very elements trying to tear it apart.
The best analogy is to see sealcoat as a high-performance sunscreen for your pavement. It lays down a tough, flexible membrane that blocks asphalt's two greatest enemies: UV radiation and water. Without that protection, the sun bakes the essential binding oils right out of the asphalt, turning it from a flexible, rich black into a brittle, faded gray. That brittleness is what leads directly to cracks.
Surface Preparation: The Foundation of a Great Sealcoat Job
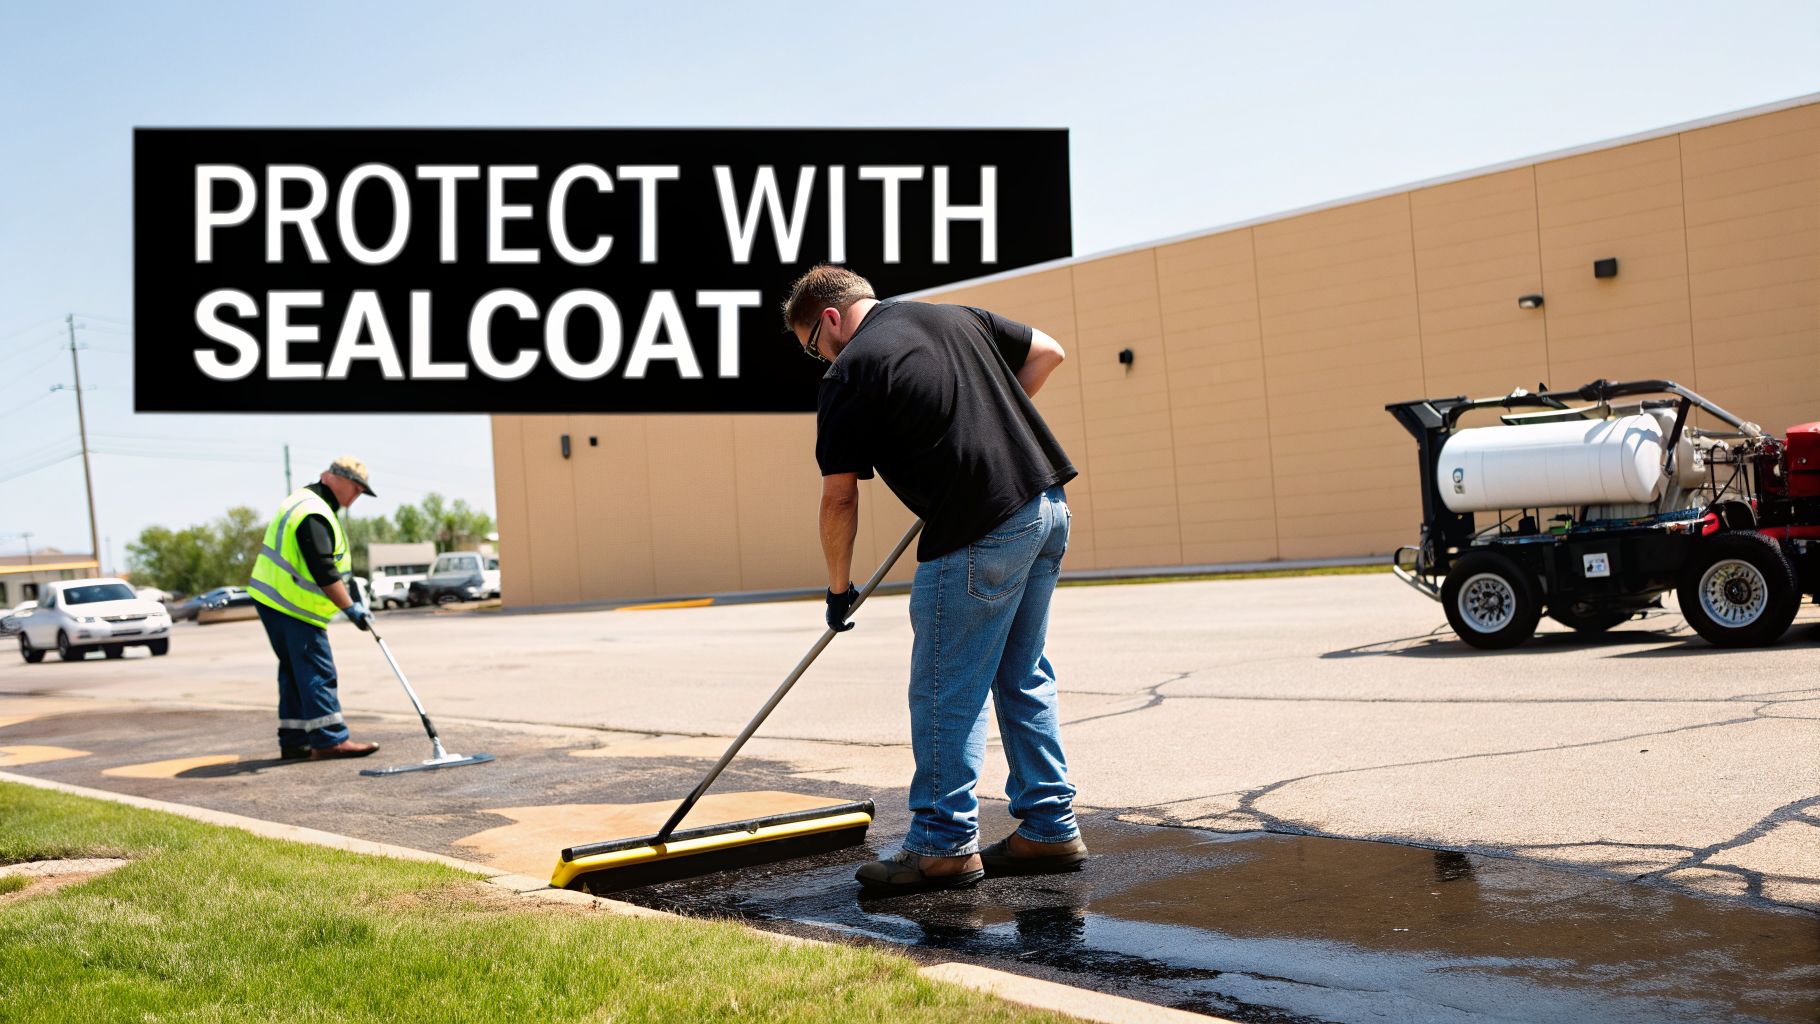
Here’s a truth you can take to the bank: a sealcoat is only as good as the surface beneath it. You simply can't spray sealant over a dirty, cracked lot and expect it to hold. In our experience, proper preparation is 90% of the job. It’s the single biggest difference between a true professional crew and the "spray-and-pray" outfits.
The work has to start with a deep, thorough cleaning. We use a combination of power blowers, steel brooms, and sometimes even pressure washers to get every bit of sand, dirt, and loose debris off the surface. Any grime left behind will act as a bond-breaker, causing the new sealcoat to flake and peel off in no time.
Next, we tackle any oil and chemical stains. These spots are notorious for repelling sealant, so we treat them with a special primer to ensure the new coat can grip the surface for a seamless, lasting finish. Finally, we address the cracks. Every single one is cleaned out and filled with a hot-pour rubberized crack filler, effectively welding them shut and stopping water from getting down into the pavement’s sub-base.
Choosing the Right Sealant and Application Method
The materials and methods used matter just as much as the prep work. For commercial lots, the two main players are asphalt emulsion and coal tar emulsion sealants. Coal tar has long been the go-to for its tough resistance to fuel spills, but asphalt emulsions are quickly gaining ground due to their superior environmental profile and fantastic protective qualities.
Once the material is selected, it's all about the application. There are two primary techniques:
- Squeegee Application: This hands-on method involves pouring sealant onto the pavement and working it in with large squeegees. It’s perfect for a first coat because it physically forces the material deep into the asphalt's pores, creating a much stronger bond.
- Spray Application: Using a spray wand delivers a fine, even coat of sealant. This gives you that smooth, uniform, jet-black appearance that makes a property look sharp. It's the ideal way to apply a second coat for a flawless finish.
Many of the best contractors use a hybrid approach: a first coat applied by squeegee to ensure deep penetration and a strong bond, followed by a second coat applied by spray for a perfectly smooth and consistent appearance.
This two-coat system delivers the best of both worlds—unbeatable durability and incredible curb appeal. It's a cornerstone of any smart paving and sealcoating maintenance plan. To get a closer look at how this all comes together, you can check out our detailed guide on how to seal coat asphalt.
The growing focus on pavement maintenance isn't just a local trend. The entire asphalt pavers market, which creates the need for services like ours, is projected to climb from USD 2.9 billion in 2025 to USD 4.5 billion by 2035. That steady growth, including a 3.15% CAGR in North America, shows a long-term commitment to infrastructure—and that means sealcoating will remain an essential service for protecting those assets.
At the end of the day, the key is to stop seeing sealcoating as an optional expense and start treating it as a vital part of your property management strategy. It’s a small, routine investment that pays for itself many times over by pushing back the need for a much more expensive paving project.
Pave or Sealcoat? A Financial Guide for Property Managers
As a property manager, deciding between a full asphalt repave and a simple sealcoat is one of the biggest financial calls you'll make. Get it right, and you save money and extend the life of your asset. Get it wrong, and you're looking at a wasted budget and bigger problems down the road.
The key is learning to read the clues your parking lot is giving you. Think of yourself as an asphalt detective—the evidence is right there on the surface, telling a story of structural health or deep-seated failure. Your job is to interpret that story correctly.
When Repaving is the Only Answer
Some asphalt issues are more than cosmetic. They’re symptoms of a failing foundation, and trying to fix them with a surface treatment like sealcoating is like putting a bandage on a broken bone. It might hide the problem for a little while, but it does nothing to solve it.
If you see these signs, it’s time to stop thinking about maintenance and start planning for reconstruction:
- Widespread "Alligator" Cracking: This web of interconnected cracks is the classic sign of base failure. It means the foundation beneath your asphalt can no longer support traffic, and the surface is literally crumbling under the weight.
- Deep Potholes: We’re not talking about minor dips. When you have potholes deeper than two inches that keep coming back even after patching, water has already penetrated your sub-base and washed away the supportive materials.
- Large, Wavy Low Spots (Birdbaths): If your lot has developed long, undulating sections where water pools for days after a storm, your subgrade has settled unevenly. This is a foundational problem that only a full removal and replacement can fix.
When your lot displays these symptoms, paving isn’t just an option—it’s the necessary investment to reset the clock on your pavement's life.
The Right Time for Sealcoating
On the other hand, if your parking lot is structurally sound but just starting to look its age, sealcoating is the perfect prescription. It’s a proactive, cost-effective treatment meant to protect the valuable asset you already own.
You’re in the sweet spot for sealcoating when you notice:
- A Faded, Gray Surface: That rich, black asphalt turning a dull, chalky gray is the first sign of sun damage. UV rays are breaking down the essential binder that holds the pavement together, making it brittle.
- Hairline Cracks: Small, thin cracks less than a quarter-inch wide are the early signs of aging. Sealing them before applying a sealcoat stops water from getting in and turning a tiny issue into a major one.
- A Rough, Sandy Texture: Run your hand over the surface. If it feels coarse and you see loose sand or small aggregate, the top layer is beginning to unravel. Sealcoating replenishes the binder that locks everything in place.
When you see these early warning signs, sealcoating is your most powerful financial tool. It is a low-cost maintenance task that defers a massive capital expense. A strategic sealcoat application can extend the life of your asphalt by years, maximizing your original investment.
A Practical Cost-Benefit Analysis
Financially, the choice comes down to this: Paving is a major upfront capital expense that gives you a brand-new asset with a 15-20 year lifespan. Sealcoating is a small, routine operational expense that protects the asset you have now, pushing that big paving project far into the future.
Strategic planning has never been more important. The global asphalt paving market was valued at around USD 65.9 billion in 2024 and is projected to hit USD 83.3 billion by 2030. This growth, fueled by infrastructure projects, shows a healthy demand that can impact scheduling and costs. You can read more on the future of asphalt in 2026 and beyond to see where the industry is headed.
By learning to spot the specific needs of your lot, you can build a multi-year budget that puts your money where it will do the most good. For more detailed cost projections for your property, our Asphalt Price Calculator offers a solid starting point for your financial planning. This proactive approach ensures you’re making the right move at the right time, whether it's a full repave or a life-extending sealcoat.
Integrating Paving, Sealcoating, and Striping
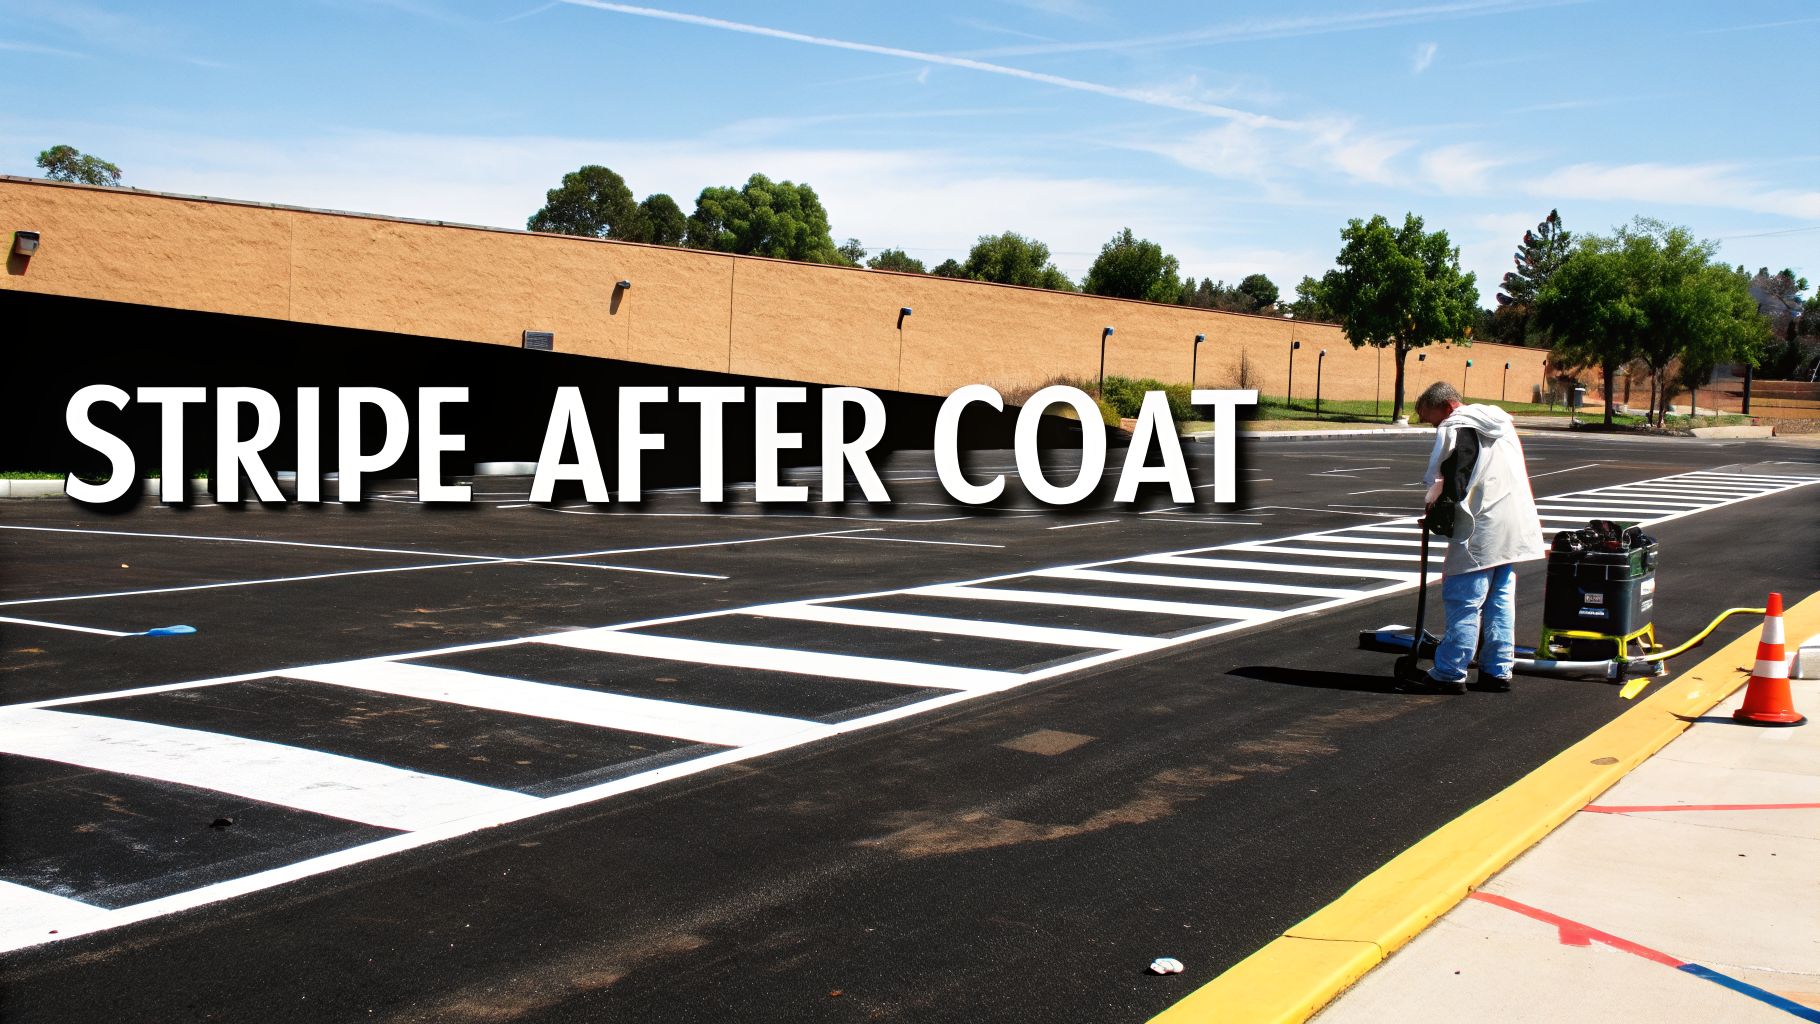
A paving project isn't finished just because the asphalt is down. While paving and sealcoating are the foundation of a healthy parking lot, the final striping is what turns that blank blacktop into a functional, safe, and compliant asset for your business.
Think about it: a freshly paved or sealcoated lot is essentially a clean slate. Without lines, it's a recipe for chaos. Drivers park inefficiently, traffic flow is a free-for-all, and you're out of compliance with essential safety codes. On a newly sealcoated surface, the deep black finish makes old, faded lines practically disappear, creating a real hazard. Fresh striping isn't just a finishing touch—it's a necessity.
To get the best result, you have to understand how these three services—paving, sealcoating, and striping—work together. It’s all about timing. Getting the sequence right is the key to a project that lasts and looks professional.
Critical Timelines and Curing Periods
The single biggest mistake we see property managers make is rushing the process. Both new asphalt and fresh sealant need time to "cure," or fully harden and set. Skipping this step can ruin your entire investment.
It's just like wet paint on a wall. You wouldn't try to hang a picture frames seconds after you put the roller down, right? The same principle applies here. If you sealcoat too soon, you'll trap solvents in the new asphalt. If you stripe too soon, the paint on top of the wet sealant will bubble, smear, and peel right off.
A seasoned contractor knows that patience pays off. Following the manufacturer's specified curing times isn't just a recommendation; it's the only way to guarantee your new surfaces will endure and your final striping will be crisp and clear.
Here are the standard timelines you absolutely must respect:
- Paving to Sealcoating: Wait a minimum of 30 days after laying new asphalt before applying a sealcoat. This gives the oils in the hot mix asphalt enough time to evaporate and the surface to properly harden.
- Sealcoating to Striping: Before painting any lines, you have to let the sealcoat fully cure. This usually takes around 24 hours, but factors like temperature, humidity, and direct sunlight can affect the time. A good rule of thumb is the surface should be completely dry and not at all tacky to the touch.
When you schedule these phases correctly, each layer bonds perfectly, giving you the performance and longevity you paid for.
Why Professional Striping Is the Final Piece of the Puzzle
After making a major investment in paving or sealcoating your lot, cutting corners on the striping is a classic case of being penny-wise and pound-foolish. Professional, compliant line painting is about much more than just looks; it’s fundamental to safety, traffic efficiency, and legal liability.
A properly striped lot delivers on several fronts:
- Maximizes Safety: Clear stop bars, crosswalks, and directional arrows are your first line of defense against accidents. They guide both drivers and pedestrians, dramatically reducing risk on your property.
- Ensures Compliance: ADA-compliant handicap stalls and clearly marked fire lanes aren't optional. They are legal mandates that protect you from steep fines and potential lawsuits.
- Improves Efficiency: A smart layout doesn't just look good—it maximizes your parking capacity and promotes an orderly flow of traffic, creating a better, less frustrating experience for your customers.
Ultimately, approaching paving, sealcoating, and striping as one cohesive project is the best way to protect your investment. Each step builds on the last, giving you a parking lot that's ready for business. To get into the nitty-gritty, take a look at our detailed guide on how to stripe parking lots for more professional tips.
Choosing Your Houston Pavement Partner
The success of your next paving or sealcoating project really comes down to the contractor you choose. A top-notch pro will leave you with a durable, professional surface that boosts your property’s curb appeal and value. A bad one? They can leave you with a failing parking lot and a wasted budget.
For property managers in the Houston area, this is the most critical decision you'll make. It’s not just about finding the lowest bid; it’s about finding a long-term partner who knows our local climate and has a solid reputation for quality work. Think of them as a consultant who's there to help you get the most out of your asphalt investment.
The Contractor Vetting Checklist
Before you even glance at an estimate, there are a few non-negotiables that separate the true professionals from the fly-by-night crews.
- Current Insurance and Licensing: Always, always ask for a Certificate of Insurance (COI). It needs to show both general liability and worker's compensation coverage. This is what protects your property from any liability if an accident happens on your job site.
- A Verifiable Local Portfolio: Any company worth its salt will be eager to show you their work. Ask for a list of recent, local projects similar to yours. Then, take a drive and see the quality for yourself.
- Demonstrated Knowledge of Local Codes: Your contractor has to be an expert on Houston’s specific codes, from ADA standards to fire lane regulations. One mistake here can mean failed inspections and expensive rework down the line.
If a contractor hesitates or gives you the runaround on any of these points, that’s an immediate red flag.
Demanding a Detailed, Written Estimate
Once you have a shortlist of qualified candidates, the estimate is your best tool for comparing them. A vague, one-line quote for "paving services" just won't cut it. A professional bid is a detailed game plan.
Your contractor's estimate should be a transparent roadmap for the entire project. It reflects their understanding of the job's scope and their commitment to clear communication, leaving no room for surprise costs or disputes later on.
Insist that any proposal you review clearly lays out the following details:
- Surface Preparation Methods: How will they clean the lot? What's the plan for treating oil spots and repairing cracks before any new material goes down?
- Materials and Application: What specific sealant or asphalt mix are they using? How many coats will be applied? Will it be a spray or squeegee application?
- Firm Project Timeline: The estimate must include a clear start date, a target completion date, and the required curing times before you can allow traffic back on the lot.
Choosing the right partner makes a paving and sealcoating project more than just a transaction—it becomes an investment in a lasting relationship. At Houston Parking Lot Striping, we build that trust from our very first conversation. Contact us today for a comprehensive, no-obligation estimate, and let's start planning how to protect and enhance your property's value.
Your Paving and Sealcoating Questions, Answered
When it comes to your property's asphalt, having clear answers is key to making the right call. We've been in this business a long time, and we hear the same questions from property managers over and over. So, let's get you the straightforward, practical information you need to build a smart maintenance plan.
How Often Should I Sealcoat My Commercial Parking Lot?
For a commercial lot, especially here in Houston where the sun and rain are relentless, you should plan on sealcoating every 2 to 3 years.
That schedule really is the sweet spot. It’s frequent enough to keep a strong protective layer on your asphalt, fighting off UV damage, water penetration, and oil spills. Think of it as a small, predictable expense that helps you avoid the huge, unexpected cost of a major repaving job down the road.
Can You Pave or Sealcoat in Any Weather?
Absolutely not. Both paving and sealcoating are completely at the mercy of the weather. If a contractor tells you otherwise, that’s a major red flag. Trying to work in the wrong conditions is just throwing money away.
Both the hot asphalt mix for paving and the liquid emulsion for sealcoating need specific temperatures to cure properly. If you ignore the forecast, you're guaranteed to get a weak surface that will start failing almost immediately.
- Paving: Hot mix asphalt needs heat to be compacted correctly. As a rule of thumb, both the ground and air temperatures should be at least 50°F and rising.
- Sealcoating: The same 50°F rule applies here, but there's another critical factor: no rain. We need a clear 24-hour window after application for the sealant to dry and cure without getting washed away.
How Long Until My Parking Lot Can Reopen?
Downtime is a huge concern, and it differs quite a bit between the two services.
With a fresh paving job, you can usually let vehicles back on within 24-48 hours. The main variable is how fast the new asphalt cools down and hardens.
After sealcoating, you have to be more patient. The lot needs to stay closed to all traffic for a minimum of 24 hours. This gives the sealant time to form that tough, protective film. If you open too soon, you’ll end up with permanent tire tracks and a mess.
Is Sealcoating a Fix for Large Cracks and Potholes?
No, and this is probably the most common misunderstanding we see. Sealcoating is purely a surface treatment for preservation—it has no structural strength.
Here’s the best way to think about it: sealcoating is the paint, but a pothole is a hole in your wall. You wouldn’t just paint over the hole and call it fixed. You have to patch the damage first, then you can paint. It’s the exact same with asphalt. You must repair the structural failures before a sealcoat will do any good.
Ready to create a smart maintenance plan for your property? The experts at Houston Parking Lot Striping have over 15 years of experience helping property managers protect their investments with professional sealcoating and compliant striping. Contact us today for a free, no-obligation estimate at https://houstonparkinglotstriping.com.