

Construction Quality Control Checklist: Pavement Marking Essentials
In the world of commercial construction, quality is not just a goal; it's a requirement that protects assets, ensures safety, and upholds brand reputation. While large-scale structural elements often get the most attention, the final details, like pavement markings, are what clients and visitors interact with daily. A poorly executed striping job can lead to immediate compliance failures, significant safety liabilities, and costly rework, undermining an otherwise successful project. This is where a robust construction quality control checklist becomes an indispensable tool.
This comprehensive guide provides a detailed, actionable checklist specifically tailored for pavement marking projects. We will move beyond generic advice and dive into the specific checkpoints that define a professional, long-lasting, and compliant finish. From verifying surface preparation and material specifications to inspecting ADA compliance and fire lane accuracy, these ten critical steps are essential for general contractors, property managers, and facility owners aiming for flawless results.
You will learn the specific, actionable steps that expert contractors use to deliver projects that meet demanding specifications the first time, every time. By implementing this checklist, you can move from hoping for quality to actively managing it. With meticulous attention to detail at each stage, you can ensure your property is safe, accessible, and professionally presented, reflecting the high standards of your entire construction project. Let's explore the key verification points that separate an acceptable job from an exceptional one.
1. Surface Preparation and Cleanliness Verification
The most critical step in any high-quality pavement marking project is the one that happens before a single drop of paint is applied. Surface preparation and cleanliness verification forms the foundation of a durable, crisp, and long-lasting striping job. This initial phase of the construction quality control checklist involves a meticulous inspection to confirm the pavement is completely clean, dry, and free of any contaminants that could interfere with paint adhesion.
Ignoring this step is the single most common reason for premature paint failure, including peeling, flaking, and rapid fading. Proper preparation ensures that the paint forms a strong mechanical bond with the asphalt or concrete, allowing it to withstand vehicle traffic, harsh weather, and chemical exposure. This checkpoint is non-negotiable for achieving a professional finish that meets both aesthetic standards and safety requirements.
Why It's a Critical Quality Checkpoint
The integrity of the pavement surface directly dictates the performance and lifespan of the striping. A poorly prepared surface guarantees a failed paint job, leading to costly rework and potential liability issues from unclear markings.
- Contaminants as Bond-Breakers: Oil, grease, dirt, dust, loose gravel, and curing compounds act as "bond-breakers," preventing the paint from properly adhering to the pavement substrate.
- Moisture's Impact: Excessive moisture trapped in the pores of concrete or asphalt can vaporize, pushing the paint off the surface from beneath and causing blistering or peeling.
- Old Paint Layers: Flaking or deteriorating paint from a previous application must be removed. Painting over an unstable layer means the new paint will fail as soon as the old layer gives way.
Key Insight: Think of surface preparation not as a preliminary task, but as 50% of the entire paint application process. The time and resources invested here yield the highest return in terms of durability and longevity for the finished project.
Implementation and Verification in Practice
Proper surface preparation involves more than a quick sweep. It requires a systematic approach tailored to the specific site conditions.
For a multi-story parking garage (50,000+ sq ft) in Houston: The project checklist would mandate high-pressure power washing (3,000+ PSI) to remove accumulated dirt, salt residue, and oil drips. The QC check involves verifying that all levels are uniformly clean and, crucially, using a moisture meter to confirm the concrete surface is below the 85% relative humidity threshold recommended by paint manufacturers like Sherwin-Williams. This check prevents delamination issues common in humid environments.
For an active warehouse floor: The plan would involve cordoning off sections and applying industrial-grade degreasers to remove forklift tire marks and hydraulic fluid spills. The verification step includes a visual inspection under bright lighting to ensure no oily sheen remains and a "water break" test, where water beads up on contaminated areas but sheets evenly over clean ones.
Actionable Tips for Your Checklist
- Schedule and Document: Plan preparation activities at least 24-48 hours before painting to allow for complete drying. Document the clean surface with time-stamped photos and attach them to the daily quality control report.
- Leverage Standards: Reference ASTM D4263 guidelines for visually assessing the cleanliness of a concrete surface before coating. This provides a clear, industry-accepted benchmark for sign-off.
- Weather Contingencies: Your checklist must include a weather hold point. Postpone all striping if rain is in the forecast within 24 hours, or if the pavement temperature is below 50°F, as this can severely impact paint curing and adhesion.
2. Line Width and Dimensional Accuracy Inspection
Precision in pavement marking is not merely about aesthetics; it is a fundamental requirement for safety, accessibility, and legal compliance. Line width and dimensional accuracy inspection is a critical phase in any construction quality control checklist, verifying that every painted line, stall, and symbol adheres strictly to the project's blueprints and governing standards like the MUTCD and ADA guidelines. This step ensures that parking spaces are usable, fire lanes are clear for emergency access, and accessible stalls meet all legal requirements.

Failing to verify these dimensions can result in significant consequences, including failed inspections, costly fines for non-compliance, and the need for complete restriping. Accurate measurements guarantee that the final layout functions as intended, providing safe and efficient traffic flow for vehicles and pedestrians. This checkpoint transforms a painted surface into a regulated and functional environment, upholding the project's integrity and purpose.
Why It's a Critical Quality Checkpoint
The dimensions of pavement markings are legally mandated and directly impact public safety and accessibility. Even minor deviations can render a parking lot non-compliant, exposing property owners to liability and negating the investment in the project.
- ADA and Code Compliance: ADA-accessible spaces have strict dimensional rules for the stall and the adjacent access aisle. A few inches off can lead to a violation and potential lawsuits. Similarly, fire lanes must meet minimum width requirements for emergency vehicle access.
- Parking Capacity and Usability: Incorrect stall dimensions can reduce the total number of available parking spaces or make them too narrow for modern vehicles, leading to door dings and frustrated tenants or customers.
- Traffic Flow and Safety: The width of directional arrows, stop bars, and crosswalks is specified to ensure visibility and driver comprehension. Inaccurate lines can create confusion and increase the risk of accidents.
Key Insight: Think of dimensional accuracy not as a final check, but as a core design specification built into the physical space. The lines on the ground are the final expression of the site's engineering, and they must be as precise as the building's foundation.
Implementation and Verification in Practice
Systematic measurement and documentation are key to ensuring dimensional accuracy across a large-scale project.
For a new shopping center with 200+ parking spaces: The quality control plan would specify that the initial ten stalls be laid out and painted, then immediately measured for verification against the 8.5' x 18' standard. Once confirmed, the crew proceeds, with random spot-checks conducted on every 20th stall thereafter. All measurements are logged on a QC form to create a compliance record.
For a hospital parking lot renovation: The checklist would prioritize the audit of all ADA-accessible spaces. A QC inspector would use a laser measure to confirm each accessible stall is exactly 8.5' wide with an adjacent 5' access aisle, totaling 13.5'. They would also verify these spaces are located on the most direct accessible route to the building's entrance, as mandated by ADA guidelines.
Actionable Tips for Your Checklist
- Utilize Modern Tools: Equip your team with laser measuring devices for fast, precise readings accurate to within ±1 inch. This is far more efficient and reliable than a traditional tape measure for large layouts.
- Establish a Baseline: Before painting begins, create a detailed layout diagram or use a template for the first stall. This serves as the master guide for the rest of the project. For in-depth guidance on this process, learn more about how to properly stripe a parking lot.
- Implement Spot-Checking: Instead of measuring every single space, implement a random sampling plan. Check stalls at the beginning, middle, and end of a row to ensure consistency is maintained throughout the job.
- Document Everything: Take photos of measurements with the measuring device visible in the frame. Attach these photos to the daily QC report and log the dimensions for a complete audit trail, providing undeniable proof of compliance.
3. Paint Quality and Material Specifications Verification
Using the right paint is just as crucial as preparing the surface. This checkpoint in the construction quality control checklist focuses on the rigorous inspection and verification of all coating materials. It ensures the selected paint meets or exceeds project specifications, industry standards like MUTCD and ASTM, and is appropriate for the unique environmental demands of Houston, including high heat, humidity, and intense UV exposure.
Choosing an inferior or incorrect type of paint is a direct path to premature failure, such as rapid color fading, poor nighttime visibility, and accelerated wear from traffic. Verifying material specifications guarantees that the striping will perform as intended, maintaining its color, reflectivity, and durability for the expected service life. This step is essential for ensuring safety, compliance, and long-term value for the property owner.
Why It's a Critical Quality Checkpoint
The material itself dictates the performance ceiling of the entire project. Even with perfect preparation and application, a low-grade paint will fail, leading to frequent, costly re-striping and potential safety liabilities from non-compliant markings.
- Durability Under Duress: Commercial properties require paint formulated to withstand constant vehicle traffic, chemical spills from vehicles, and harsh cleaning agents. A standard latex paint will quickly abrade and disappear under these conditions.
- Compliance and Safety: Standards from the MUTCD dictate specific colors (e.g., ADA Blue) and retroreflectivity levels for markings to be legally compliant and visible at night. Verifying these properties is non-negotiable.
- Climate-Specific Performance: Houston’s climate can be brutal on exterior coatings. A quality check ensures the specified paint, like products from Sherwin-Williams' TrafficPaint line, is formulated to resist fading from UV rays and delamination caused by high humidity.
Key Insight: The paint can't just look right on day one; it must be engineered to perform correctly for years. Verifying the product data sheet against the project requirements is the only way to ensure you're not applying a temporary solution to a permanent need.
Implementation and Verification in Practice
Material verification goes beyond simply checking the label on a bucket. It involves a documented process of confirmation and testing.
For a new retail shopping center: The checklist would require the contractor to submit the technical data sheets for their proposed paint, such as PPG PermaLine, for review. The QC inspector verifies that the product is a fast-drying, 100% acrylic waterborne traffic paint rated for high-traffic asphalt and concrete. A key verification step involves checking the batch numbers on all delivered paint pails to ensure consistency and retaining these records for warranty purposes.
For an industrial warehouse with heavy forklift traffic: The project plan would specify a two-part epoxy or polyurethane paint for its superior chemical and abrasion resistance. Verification involves not only confirming the product but also conducting a small test patch in a low-traffic area. This test confirms adhesion to the sealed concrete floor and allows the facility manager to assess the cure time, which Houston's humidity can extend from 24 to 48 hours.
Actionable Tips for Your Checklist
- Document Everything: Require submittals of technical data sheets for all paints and materials before they arrive on site. Keep a log of all paint batch numbers used in specific areas for future traceability and touch-ups.
- Specify Standards: Your checklist should explicitly reference the required standards. For example, state "All accessible parking markings must use paint that meets MUTCD color code for Pantone 3005c" or "All markings must meet ASTM D711 for durability."
- Conduct On-Site Tests: Before full-scale application, apply a small test strip of the paint. Evaluate its color, adhesion, and drying time under actual site conditions. This simple step can prevent catastrophic, project-wide failures. For a deeper dive into application methods, you can Learn more about how to properly stripe parking lots.
4. ADA Compliance and Accessible Space Positioning Verification
Beyond simple paint on pavement, this checkpoint is a matter of civil rights law, accessibility, and risk management. ADA Compliance and Accessible Space Positioning Verification is a non-negotiable part of any construction quality control checklist for commercial properties. It involves a detailed inspection to ensure every designated accessible parking space, its adjoining access aisle, and all related signage precisely meet the standards set by the Americans with Disabilities Act (ADA).
Failure to adhere to these strict requirements exposes property owners to significant financial risk, including federal lawsuits, steep fines, and mandated remediation costs. More importantly, it creates barriers for individuals with disabilities, denying them safe and equitable access to facilities. This verification step ensures a property is not only legally compliant but also genuinely inclusive and welcoming to all patrons and employees.
Why It's a Critical Quality Checkpoint
Properly marked and located accessible parking is not a suggestion; it's a federal mandate. This check prevents costly legal battles and ensures a facility serves its entire community, forming a critical component of a comprehensive construction quality control checklist.
- Legal and Financial Risk: The U.S. Department of Justice actively enforces ADA standards. Non-compliance can lead to discrimination lawsuits, government-imposed penalties, and negative publicity that can damage a business's reputation.
- Functional Accessibility: The specific dimensions, slopes, and locations are designed for a reason. An access aisle that is too narrow, a space located too far from an entrance, or a ramp with an improper slope can make a facility unusable for someone relying on a wheelchair or other mobility aids.
- Project Sign-Off: Many municipalities will not issue a certificate of occupancy for a new construction or renovation project until ADA compliance, including parking, has been fully verified by inspectors.
Key Insight: View ADA compliance not as a line item on a checklist, but as a fundamental design and safety requirement. Getting it right from the start is infinitely less expensive and disruptive than correcting it after a complaint is filed or an injury occurs.
Implementation and Verification in Practice
Verification must be precise, as even minor deviations can result in non-compliance. This requires measuring dimensions, checking locations, and verifying signage specifications.
For a 100-space retail parking lot in Houston: The quality control plan mandates that at least 4 accessible spaces be provided. The verification check involves using a measuring tape to confirm each space is at least 8 feet wide with an adjacent 5-foot-wide access aisle. The inspector also confirms these spaces are located on the shortest accessible route to the main storefront entrance.
For a new medical office building: The checklist requires a specific focus on "van-accessible" spaces. The QC inspector must verify that at least one of every six accessible spaces has an 8-foot-wide access aisle and is marked "van-accessible." They also check that the post-mounted International Symbol of Accessibility (ISA) signs are installed so the bottom edge is at least 60 inches above the ground.
Actionable Tips for Your Checklist
- Verify Placement First: Before striping, use chalk lines or temporary markers to lay out accessible spaces. Confirm they are on the shortest accessible route to the building's entrance, avoiding paths that require users to pass behind parked cars.
- Measure Everything: Do not eyeball dimensions. Use a tape measure to verify the width of parking spaces, access aisles, and the height of signage. Document these measurements with photographs that include the tape measure for proof of compliance.
- Use Official Guidelines: Your checklist should directly reference the 2010 ADA Standards for Accessible Design as the sole source of truth. This prevents confusion and ensures your team is working from the correct legal requirements.
- Document and Photograph: Create a specific section in your daily QC report for ADA compliance. Include clear, dated photos of every accessible space, its access aisle, and its signage after installation is complete.
5. Fire Lane and Emergency Access Route Inspection
Beyond standard parking, no element of a pavement marking project carries more weight for life safety than the proper designation of fire lanes. This critical part of any construction quality control checklist involves the verification that all fire lanes, emergency exits, and access routes are clearly marked, meticulously maintained, and completely free from obstruction. This checkpoint isn't merely about paint on the ground; it's about ensuring unhindered access for first responders when every second counts.
Neglecting fire lane requirements is a direct violation of local and international fire codes, creating significant liability for property owners and contractors. These markings must meet stringent local regulations regarding color, width, and signage to be compliant. Proper inspection ensures that emergency vehicles can navigate a property efficiently, potentially saving lives and minimizing property damage during a crisis.
Why It's a Critical Quality Checkpoint
Fire lane compliance is a non-negotiable legal and safety requirement. A blocked or improperly marked access route can delay emergency response, turning a manageable incident into a catastrophe. This check is essential for protecting assets and, more importantly, people.
- Code Compliance: Municipalities, like the Houston Fire Department, enforce strict codes based on the International Fire Code (IFC). Failure to comply can result in hefty fines, project delays, and denied certificates of occupancy.
- Life Safety Priority: In an emergency, fire trucks and ambulances need clear, wide, and structurally sound paths. Any ambiguity or obstruction in these routes presents a direct risk to building occupants and emergency personnel.
- Insurance and Liability: Insurance carriers often require proof of compliant fire lane maintenance. In the event of an incident, non-compliant markings can lead to denied claims and expose property owners to significant legal liability.
Key Insight: Treat fire lane markings as a critical piece of life-safety equipment, just like a fire sprinkler system or an alarm. Their function is to work perfectly when needed most, and their inspection must be treated with the same level of seriousness.
Implementation and Verification in Practice
Effective fire lane verification requires coordination with local authorities and a detailed, site-specific plan that goes beyond simply painting red lines.
For a large shopping center in Houston: The quality control plan must first involve obtaining the exact specifications from the Harris County Fire Marshal's office. The QC check confirms the lane is at least 20 feet wide, painted with traffic-rated red paint, and clearly stenciled "NO PARKING – FIRE LANE" at required intervals. Verification also includes confirming that proper signage is installed at the correct height and that curb markings are present and highly visible.
For a multi-family apartment complex: The checklist would mandate designated emergency access routes at every entrance, ensuring they remain clear of tenant vehicles and dumpsters. The verification process includes a "drive-through" test with a large vehicle to simulate fire truck access, checking for tight turns, low-hanging tree branches, or other obstructions that could impede passage.
Actionable Tips for Your Checklist
- Consult Local Authorities First: Before any paint is ordered, consult the local fire marshal. Requirements for width, color, stenciling, and signage can vary significantly between Houston, Pearland, or Sugar Land. Get written specifications.
- Document and Log Inspections: Create a documented fire lane maintenance log. Perform and record monthly inspections, noting any encroachments or paint degradation. This log is invaluable for compliance audits and insurance purposes.
- Enhance Nighttime Visibility: For properties with 24/7 operations, your checklist should specify reflective paint or glass beads for all fire lane markings. Additionally, install reflective or LED-illuminated fire lane signs to ensure they are clearly visible after dark.
- Verify Hydrant Clearance: Ensure fire hydrant clearance zones (typically a 15-foot radius) are painted, usually in yellow or red, and accompanied by prohibitive signage to prevent vehicles from blocking access.
6. Application Technique, Coverage Uniformity, and Equipment Verification
Beyond surface preparation and material selection, the skill of the applicator and the reliability of their equipment are where a pavement marking project truly succeeds or fails. This crucial checkpoint in the construction quality control checklist involves real-time inspection of the painting process itself. It ensures the paint is applied with uniform coverage, consistent color, and sharp edge definition, free from common defects like drips, overspray, or thin spots.
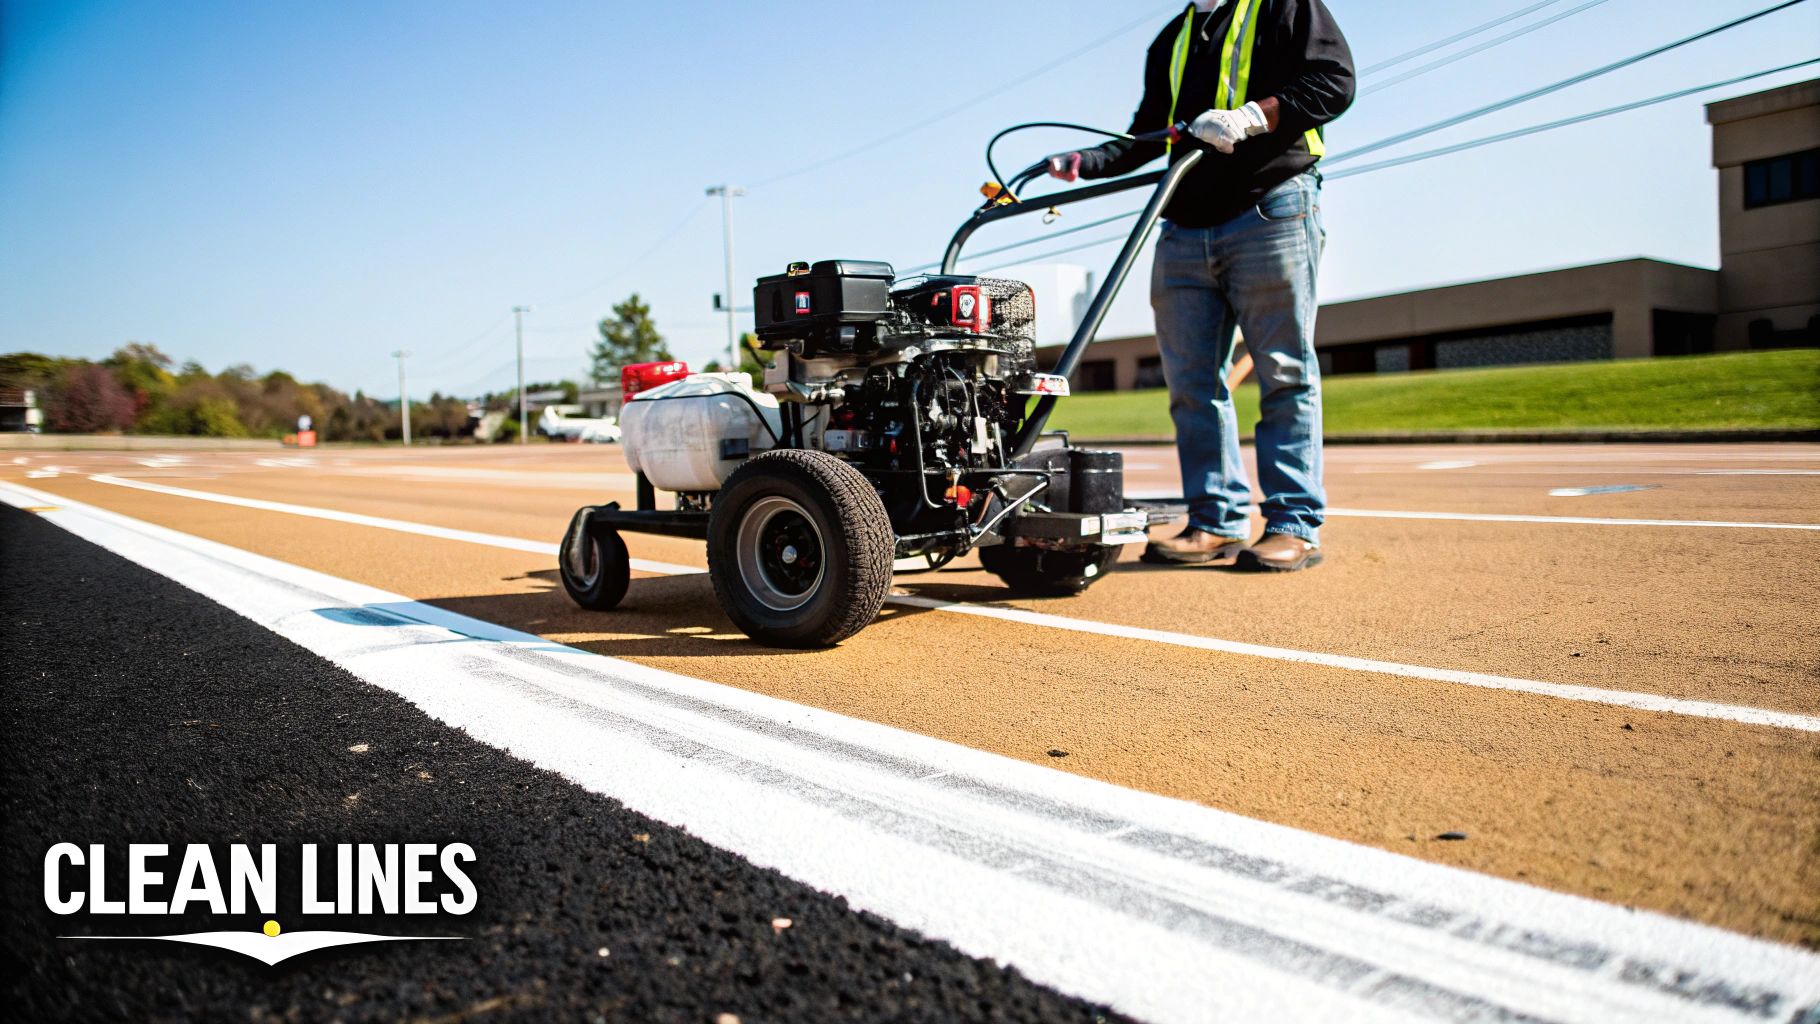
This step confirms that skilled technique is paired with properly calibrated and maintained equipment. An amateur application, even with premium paint, will result in rough edges, inconsistent thickness, and premature failure. Conversely, a professional using well-maintained equipment produces crisp, durable lines that enhance safety and aesthetics, directly impacting the visual quality and longevity of the entire project.
Why It's a Critical Quality Checkpoint
The final appearance and durability of the pavement markings are a direct result of the application method. Poor technique or malfunctioning equipment can undermine all previous quality efforts, leading to a visually unappealing and unsafe environment that requires costly rework.
- Consistency is Key: Inconsistent application results in stripes that wear unevenly. Thinner areas will fade and chip away faster, while thicker areas may take longer to cure and can be prone to peeling.
- Edge Definition and Safety: Crisp, clean lines are essential for legibility and traffic management. Feathered or blurry edges, often caused by improper spray pressure or worn tips, reduce visibility and look unprofessional.
- Equipment Reliability: A sudden equipment failure, like a clogged spray gun or a failing pump, can halt a project, cause schedule delays, and create inconsistent results when work resumes.
Key Insight: The final product is a direct reflection of the applicator's skill and the condition of their tools. Verifying both aspects in real-time is the only way to guarantee the project meets the specified standards for both appearance and performance.
Implementation and Verification in Practice
Integrating this check requires active on-site supervision and standardized equipment protocols, not just a final walk-through.
For a large retail parking lot in Houston: The quality control plan would specify that the lead painter must have at least five years of striping experience. The QC inspector would perform a spot check at the start of the day, verifying the first few lines for uniform thickness using a wet film thickness (WFT) gauge, ensuring they meet the manufacturer's specified mil thickness for durability against high traffic.
For an active industrial warehouse: The checklist would mandate that all equipment, including backup line stripers, be function-tested before entering the facility. During application of safety walkways and forklift lanes, the QC manager would inspect for overspray onto adjacent machinery or racks. Any overspray would trigger an immediate stop to adjust equipment pressure and shielding, preventing widespread cleanup issues.
Actionable Tips for Your Checklist
- Specify Experience: Mandate in your contract that the application crew, particularly the machine operator, has a minimum of 5 years of specific experience in commercial pavement marking.
- Conduct In-Process Inspections: Don't wait until the end. Perform quality checks at the beginning, middle, and end of each day. Document any issues with photos and address the root cause immediately, whether it's technique or equipment.
- Maintain Equipment Logs: Require your contractor to provide maintenance logs for their primary striping equipment. A well-maintained machine is far less likely to fail mid-project.
- Calibrate Measurement Tools: Ensure all measurement devices, especially thickness gauges, are calibrated annually through a certified service. Document the calibration certificates in the project file.
7. Symbol, Stencil, and Directional Marking Accuracy Inspection
Beyond the primary lines, the symbols, stencils, and directional arrows are what bring a parking facility to life, transforming it from a simple grid into an organized, compliant, and intuitive space. This part of the construction quality control checklist focuses on verifying that all specialized markings are applied with absolute precision. This includes handicap symbols, loading zone text, directional arrows, and reserved space designations.
Getting these details right is not merely about aesthetics; it is a matter of legal compliance, safety, and operational efficiency. Incorrectly placed or sized symbols can lead to ADA non-compliance fines, driver confusion, and inefficient traffic flow. This checkpoint ensures every graphic element serves its intended purpose clearly and correctly, safeguarding both property owners and users.
Why It's a Critical Quality Checkpoint
The clarity and accuracy of stenciled markings directly impact the functionality and legal standing of a commercial property. Vague or incorrect symbols create confusion and liability, undermining the entire purpose of a professionally managed parking area.
- ADA and Legal Compliance: The Americans with Disabilities Act (ADA) and the Manual on Uniform Traffic Control Devices (MUTCD) have strict guidelines for the size, color, and placement of accessibility symbols and traffic-directing arrows. Failure to adhere to these standards can result in significant penalties.
- Operational Efficiency: Clear directional arrows and designated zone markings (e.g., "LOADING ZONE," "VISITOR PARKING") are essential for guiding drivers, preventing congestion, and ensuring smooth operations, especially in high-traffic retail or warehouse environments.
- Safety and Navigation: Unambiguous stencils help prevent accidents by clearly communicating traffic flow, pedestrian crossings, and restricted areas. They are a fundamental component of a safe and easily navigable property.
Key Insight: Think of symbols and stencils as the official language of your parking lot. If the language is unclear, misspelled, or used incorrectly, the message is lost, leading to chaos and potential legal consequences. Precision here is non-negotiable.
Implementation and Verification in Practice
A robust quality check for stencils involves pre-planning, precise execution, and diligent post-application review, tailored to the specific needs of the property.
For a new retail complex in Houston: The quality control plan would mandate a pre-application walkthrough where the project manager and striping foreman use chalk to outline the exact placement of all directional arrows and ADA symbols. The QC check involves using a tape measure to verify that the handicap symbols match ADA dimensions precisely and that directional arrows are positioned to provide clear guidance at every intersection and decision point within the lot.
For an active warehouse with multiple zones: The checklist would require using distinct, color-coded stencils for "DELIVERY," "STAFF," and "VENDOR" parking. The verification step includes ensuring these stencils are applied in their designated zones as per the site logistics plan and are large enough to be easily read by truck drivers from their elevated cabs, preventing operational delays.
Actionable Tips for Your Checklist
- Specify High-Quality Stencils: Mandate the use of durable, professional-grade aluminum or high-density plastic stencils. These provide crisp, clean lines and ensure dimensional consistency across the entire project, unlike flimsy paper or cardboard.
- Pre-Application Layout and Approval: Require a chalk or temporary tape outline of all stencil placements for final review and sign-off before paint is applied. This simple step prevents costly mistakes in positioning.
- Verify Regulatory Dimensions: Your checklist must include a line item to measure and confirm that all accessibility symbols meet current ADA guidelines and that traffic control markings conform to MUTCD standards.
- Document and Organize: Keep a photo log of the completed stencils and maintain the stencil set in good condition. This ensures that future touch-ups or restriping projects will maintain perfect consistency with the original layout.
8. Moisture and Environmental Condition Verification During Application
Applying pavement marking paint is a chemical process, and its success is dictated by the surrounding environment at the moment of application. This checkpoint on the construction quality control checklist involves the real-time assessment of ambient temperature, surface temperature, humidity, and wind speed. These atmospheric variables are not minor details; they are critical factors that control how paint cures, adheres, and ultimately performs over its service life.
In Houston's humid subtropical climate, ignoring environmental conditions is a recipe for disaster. High humidity can dramatically slow down the curing process of waterborne paints, while extreme heat can cause solvent-based paints to cure too quickly, trapping solvents and leading to a weak, brittle finish. This verification step ensures the paint is applied only within the manufacturer's specified environmental window, guaranteeing optimal bond strength and durability.
Why It's a Critical Quality Checkpoint
The paint's technical data sheet provides a strict set of environmental parameters for a reason. Applying outside of these conditions compromises the chemical reactions necessary for a durable finish, leading to premature failures that require complete restriping.
- Humidity's Impact on Curing: High relative humidity (often above 85%) prevents the water in waterborne acrylics from evaporating efficiently, significantly extending cure times and leaving fresh markings vulnerable to damage from early traffic.
- Temperature Extremes: Pavement temperatures below 50°F can prevent proper film formation, resulting in poor adhesion. Conversely, surfaces above 120°F, common on Houston asphalt in summer, can cause paint to "flash dry" on the surface, trapping solvents and leading to blistering.
- Dew Point and Condensation: If the surface temperature is at or below the dew point, a thin, invisible layer of condensation will form, acting as a bond-breaker and guaranteeing adhesion failure.
Key Insight: Think of the weather as an active ingredient in your paint formula. If the environmental conditions are wrong, the paint mixture itself is compromised, and no amount of skilled application can save the project from premature failure.
Implementation and Verification in Practice
Monitoring environmental conditions requires the right tools and a proactive, data-driven approach rather than guesswork.
For a summer striping project at a Houston-area distribution center: The QC plan mandates that work begins between 5-6 AM, before the asphalt temperature exceeds the paint manufacturer’s 120°F maximum. The crew supervisor uses a digital infrared thermometer and a hygrometer to take readings every 30 minutes, logging them in the daily report. Work is halted by 9 AM as the surface temperature consistently rises above the acceptable threshold, preventing heat-induced curing defects.
For a large retail parking lot project in the spring: The checklist requires constant monitoring of the weather forecast. When an unexpected rain shower is predicted within 24 hours, the project manager makes the call to postpone application. This prevents a scenario where a sudden downpour washes away thousands of dollars in uncured paint, a common issue for projects that don't rigorously follow weather-related hold points.
Actionable Tips for Your Checklist
- Invest in Digital Tools: Equip your team with a reliable infrared thermometer and a digital hygrometer. These tools provide precise, real-time data to make informed go/no-go decisions on-site.
- Know Your Dew Point: Use a dew point calculator (many weather apps include this) and ensure the pavement surface temperature is at least 5°F above the dew point before and during application. This is a non-negotiable step in any professional construction quality control checklist.
- Schedule Around the Weather: In Houston, plan major striping projects for the more stable, less humid months of spring (March-May) and fall (September-November). If summer work is unavoidable, schedule it for early morning hours.
- Document Everything: Record the time, ambient temperature, surface temperature, humidity, and wind speed at the start of the project and at regular intervals. Attach this log to your daily quality report as evidence of due diligence.
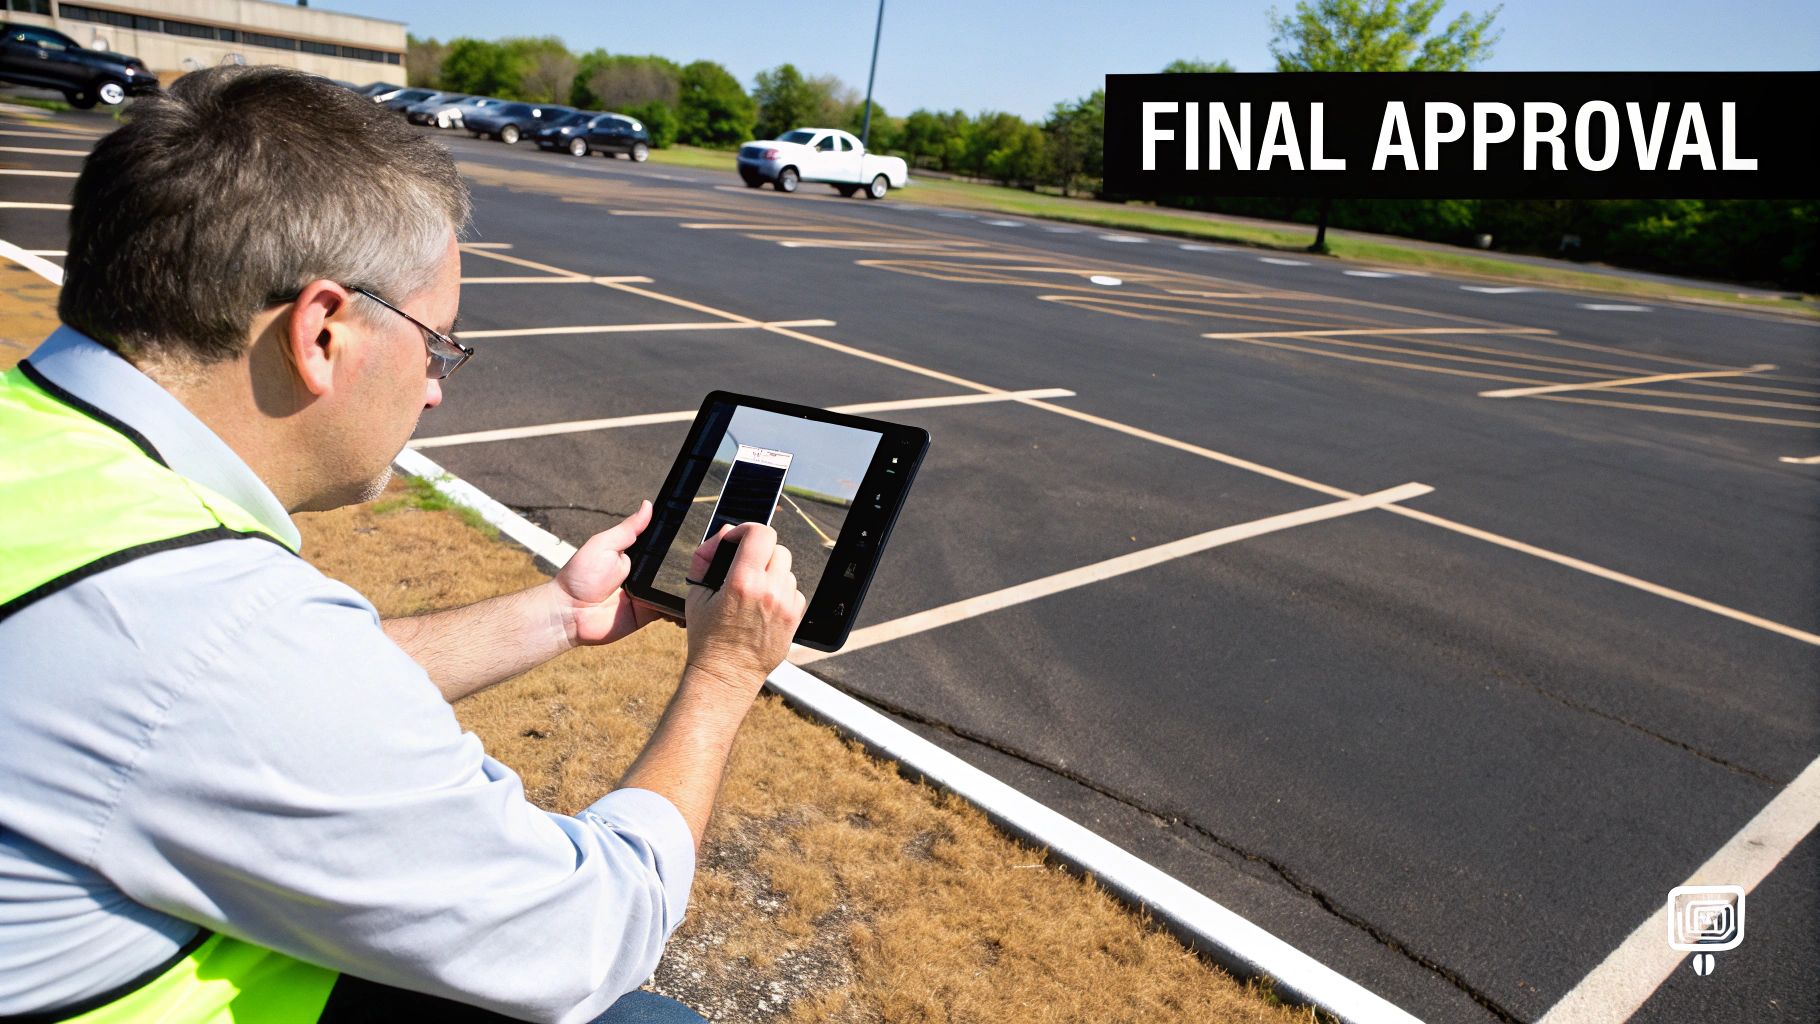
9. Final Inspection, Documentation, and Quality Approval Process
The project isn't finished when the last line is painted; it's finished when the quality has been verified, documented, and formally accepted. The final inspection, documentation, and quality approval process is the concluding checkpoint in a robust construction quality control checklist. This phase involves a comprehensive post-application walkthrough to confirm all work meets or exceeds project specifications, followed by the systematic creation of a final report for client sign-off.
This final step transforms completed work into a verified and warrantied asset for the client. It provides indisputable proof of quality, ensures every requirement has been met, and formalizes the handover from the contractor to the property owner. Neglecting this crucial stage leaves both parties exposed to future disputes, liability issues, and ambiguity regarding project completion and warranty terms.
Why It's a Critical Quality Checkpoint
This process serves as the official record of project success and the foundation for the client relationship moving forward. It provides accountability and protects the contractor by creating a clear, mutually agreed-upon endpoint for the scope of work.
- Verifies Compliance: A meticulous final inspection confirms that all specifications, from paint type and line width to ADA and fire lane compliance, have been precisely followed.
- Mitigates Disputes: Signed documentation with photographic evidence eliminates "he said, she said" scenarios, providing a clear record of the site's condition upon completion.
- Activates Warranty: The client's formal approval and sign-off are typically the trigger that activates the workmanship warranty, defining the start date and terms of coverage.
Key Insight: Treat the final documentation not as a closing formality, but as the project's permanent resume. This comprehensive report is your proof of performance, your defense against future claims, and your best tool for securing repeat business.
Implementation and Verification in Practice
The final approval process should be systematic, not an informal walkthrough. It requires a prepared checklist and clear communication with the client.
For a new Houston-area retail center: The project manager schedules a joint site walk with the property manager using a pre-prepared checklist. They measure a sample of parking stalls, verify the ADA-compliant van-accessible aisles are correctly marked, and use a retroreflectometer to confirm the nighttime visibility of markings meets project specs. The walkthrough concludes with the property manager signing the digital checklist on a tablet, which automatically generates a complete PDF report with time-stamped photos.
For a large industrial warehouse facility: The final documentation package includes not only photos and an inspection report but also as-built drawings showing the final parking and traffic flow layout. This document is crucial for the facility’s operations manager to update site safety plans and manage future modifications or repairs, providing tangible value beyond the paint job itself.
Actionable Tips for Your Checklist
- Standardize Your Inspection: Create a standard final inspection checklist covering all potential project requirements (line dimensions, color codes, ADA/fire lane specs, stenciling) and use it for every job.
- Photograph for Context: Capture images at different times (daylight, dusk) to demonstrate marking visibility. Take wide-angle shots for overall context and close-ups of critical elements like ADA symbols.
- Secure Written Sign-Off: Never consider a project complete without formal written approval from the client. This sign-off should explicitly state that the work meets all agreed-upon specifications.
- Document and Detail the Warranty: Provide a clear, detailed warranty document. Explain coverage, duration, and specific exclusions (e.g., normal wear from traffic, damage from snowplows, chemical spills) to manage expectations.
- Establish a Follow-Up Cadence: Schedule and include 30-day and 90-day follow-up inspections in your process. This proactive step helps identify any potential adhesion issues early and demonstrates a commitment to long-term quality.
10. Slip Resistance and Safety Surface Treatment Verification
Beyond creating visually clear markings, a critical aspect of a comprehensive construction quality control checklist is ensuring that painted surfaces are safe for both pedestrians and vehicles. Slip resistance and safety surface treatment verification confirms that newly striped areas, especially those in high-traffic or weather-exposed zones, provide adequate traction and do not introduce new hazards. This is particularly vital in Houston's climate, where frequent rain and humidity can make standard painted surfaces dangerously slick.
Ignoring this checkpoint transforms a functional parking lot into a potential liability. A smooth, glossy paint finish on a walkway or ramp can become as slippery as ice when wet, leading to slips, falls, and accidents. Verifying the use of appropriate anti-slip additives and coatings is a proactive measure to protect property owners from personal injury claims and ensure compliance with safety standards.
Why It's a Critical Quality Checkpoint
The coefficient of friction on a painted surface directly impacts public safety and a facility's operational risk. This quality check is essential for mitigating liability and ensuring the well-being of anyone using the space.
- Preventing Slips and Falls: High-traffic pedestrian areas like crosswalks, accessibility ramps, and building entrances require textured surfaces to maintain grip, especially during Houston's notorious downpours.
- Ensuring Vehicle Traction: Sloped surfaces such as parking garage ramps or loading docks need enhanced grip to prevent vehicles from sliding, particularly during acceleration or braking in wet conditions.
- Compliance with Safety Standards: Regulatory bodies like OSHA mandate safe walking and working surfaces. Proper slip resistance is not just a best practice; it is a requirement for maintaining a safe operational environment and avoiding fines.
Key Insight: Treat every painted pedestrian surface as a potential slip hazard until proven otherwise. The goal is not just to apply paint, but to install a complete, safe, and functional flooring system that accounts for real-world environmental conditions.
Implementation and Verification in Practice
Integrating slip resistance requires planning and the use of specialized materials, confirmed through on-site checks.
For a retail parking lot near the Galleria: The project plan would specify a high-friction surface treatment using an aggregate-infused epoxy coating for all marked pedestrian crosswalks and ADA-compliant pathways. The QC verification involves inspecting a sample application to confirm the texture is uniform and meets the manufacturer's specifications for aggregate distribution. A field test using a digital slip meter (tribometer) could be required to document the static coefficient of friction, ensuring it meets the 0.5 or greater standard recommended by the Americans with Disabilities Act (ADA).
For an industrial warehouse loading dock: The checklist would mandate the use of a two-part epoxy paint with a broadcast of aluminum oxide grit for maximum durability and slip resistance. Verification includes a visual check to ensure the grit is evenly distributed and fully embedded in the coating, with no loose particles. The QC manager would also confirm that painted safety yellow lines marking the dock edge are equally treated to prevent worker slips.
Actionable Tips for Your Checklist
- Specify Materials Clearly: Your scope of work must explicitly call for anti-slip additives (like polymer grit or silica) to be mixed into the paint for designated areas. Reference the specific product to be used.
- Document and Certify: Keep records of the anti-slip products used, including manufacturer data sheets that specify the resulting coefficient of friction. This documentation is invaluable for liability protection.
- Test and Approve Mockups: Before full-scale application, require the contractor to create a small test patch in a non-critical area. Walk on it (when dry and wet) to physically assess the grip and get client approval before proceeding.
- Plan for Maintenance: Textured surfaces can trap dirt, which reduces their effectiveness over time. Your handover documentation should include a maintenance plan recommending periodic pressure washing to keep the surface clean and safe.
10-Point Construction Quality Control Comparison
| Item | Implementation Complexity 🔄 | Resource Requirements ⚡ | Expected Outcomes ⭐📊 | Ideal Use Cases | Key Advantages 📊 | Quick Tip 💡 |
|---|---|---|---|---|---|---|
| Surface Preparation and Cleanliness Verification | Moderate–High 🔄: multi-step, weather-dependent | Pressure washers, degreasers, labor, drying time ⚡ | Improved adhesion & longevity ⭐⭐⭐⭐ 📊 fewer callbacks | Large garages, oil-stained retail lots, warehouses | Better paint adhesion; fewer reworks 📊 | Schedule 1–2 days prior; use moisture meters 💡 |
| Line Width and Dimensional Accuracy Inspection | High 🔄: precise measurements, low tolerance for error | Laser/tape measures, templates, skilled personnel ⚡ | Regulatory compliance & correct capacity ⭐⭐⭐⭐ 📊 | Shopping centers, hospitals, large lots | Reduces liability; ensures ADA/fire compliance 📊 | Use laser tools & layout templates; spot-checks 💡 |
| Paint Quality and Material Specifications Verification | Moderate 🔄: testing batches and specs | High-quality paints, reflectivity/DFT tools, lab tests ⚡ | Durable, color- and reflectivity-compliant markings ⭐⭐⭐⭐ 📊 | Hot/humid climates, ADA color-critical areas, heavy traffic | Longevity; fewer warranty claims 📊 | Do test patches; record batch numbers; check cure times 💡 |
| ADA Compliance and Accessible Space Positioning Verification | High 🔄: complex regulations & precise placement | ADA guidelines, measuring tools, signage, specialist input ⚡ | Full ADA compliance; reduced legal risk ⭐⭐⭐⭐⭐ 📊 | Medical facilities, retail, campuses, garages | Avoids lawsuits; improves accessibility & reputation 📊 | Consult ADA specialist; document locations & photos 💡 |
| Fire Lane and Emergency Access Route Inspection | Moderate 🔄: code variability & enforcement needs | Red paint, signage, measurements, coordination with fire marshal ⚡ | Clear emergency access & code compliance ⭐⭐⭐⭐ 📊 | Shopping centers, apartments, industrial sites | Life-safety protection; fewer citations 📊 | Verify local fire code first; maintain clearance logs 💡 |
| Application Technique, Coverage Uniformity, and Equipment Verification | High 🔄: skilled operators & precise calibration | Line stripers, spray guns, DFT gauges, spare parts, maintenance ⚡ | Consistent lines, uniform coverage, longer lifespan ⭐⭐⭐⭐ 📊 | Large re-striping jobs, garages, warehouses | Professional finish; reduced rework 📊 | Daily quality checks; keep spare parts; calibrate gauges 💡 |
| Symbol, Stencil, and Directional Marking Accuracy Inspection | Moderate 🔄: careful stencil alignment & sizing | Durable stencils, signage, labor, layout tools ⚡ | Clear wayfinding & compliant symbols ⭐⭐⭐ 📊 | Retail, corporate campuses, loading zones | Better traffic flow; reduced disputes 📊 | Use aluminum stencils; outline placement with chalk/tape 💡 |
| Moisture and Environmental Condition Verification During Application | Moderate 🔄: continuous monitoring & scheduling | Thermometer, hygrometer, moisture meters, weather monitoring ⚡ | Proper curing and adhesion; fewer failures ⭐⭐⭐⭐ 📊 | Humid climates (Houston), summer projects, early-morning work | Data-driven timing reduces rework 📊 | Monitor dew point; avoid rain; schedule early mornings 💡 |
| Final Inspection, Documentation, and Quality Approval Process | Low–Moderate 🔄: systematic walkthrough and reporting | Checklist, camera/tablet, reporting software, documentation storage ⚡ | Accountability, warranty protection, audit trail ⭐⭐⭐⭐ 📊 | All projects, contractual or insured work | Legal protection; client confidence; baseline records 📊 | Use standardized checklist; retain records 5–7 years 💡 |
| Slip Resistance and Safety Surface Treatment Verification | Moderate 🔄: testing + specialty coatings | Anti-slip additives, slip testers, application equipment ⚡ | Reduced slip incidents; OSHA/aligned safety ⭐⭐⭐⭐ 📊 | Ramps, loading docks, garage floors, pedestrian zones | Lower liability; improved pedestrian safety 📊 | Test samples first; budget for additives; plan maintenance 💡 |
Implementing Quality Control for Long-Term Success
Navigating the intricacies of a commercial construction project, particularly pavement marking, requires more than just high-quality materials and skilled labor. True success is rooted in a systematic, detail-oriented approach to quality assurance. The comprehensive construction quality control checklist we have explored is not merely a set of procedural steps; it is a strategic framework designed to transform a good project into an exceptional one. It serves as the bedrock for consistency, compliance, and long-term durability.
By systematically addressing each checkpoint, from the critical initial phase of surface preparation to the final inspection and documentation, you are building a multi-layered defense against common project pitfalls. This methodical process ensures that every element, whether it's the precise dimensional accuracy of a parking stall or the stringent requirements for ADA-compliant spaces, is executed to the highest standard. It moves quality control from a reactive, problem-solving activity to a proactive, preventative strategy, saving significant time, money, and reputational risk down the line.
From Checklist to Culture: The Real Value of Diligence
The true power of a construction quality control checklist is realized when it evolves from a simple document into a core tenet of your project management culture. When every stakeholder, from the general contractor to the boots-on-the-ground crew, understands and commits to these standards, you create a powerful alignment toward a shared goal: excellence. This commitment translates into tangible benefits that extend far beyond the freshly painted lines of a parking lot.
Consider the ripple effects of a meticulously executed project:
- Enhanced Safety: Properly marked fire lanes, clear directional arrows, and slip-resistant surfaces are not just about compliance; they are critical safety features that protect employees, customers, and visitors.
- Risk Mitigation: Verifying ADA compliance, moisture conditions, and material specifications proactively prevents costly fines, rework, and potential legal challenges.
- Asset Longevity: Ensuring proper surface preparation and material application directly impacts the durability of the markings, protecting your investment and reducing long-term maintenance costs.
- Professional Reputation: A flawlessly executed project serves as a powerful testament to your commitment to quality, enhancing your brand and attracting future business.
Key Takeaway: A robust quality control process is an investment in the long-term value and safety of your property. It’s the difference between a project that simply meets the minimum requirements and one that delivers lasting performance and peace of mind.
Actionable Next Steps for Flawless Execution
Moving forward, the path to implementing this level of quality is clear. The first step is to formally adopt a detailed checklist tailored to your specific project needs. Do not treat it as a formality to be completed after the fact. Instead, integrate it directly into your project workflow.
- Assign Clear Responsibilities: Designate a specific individual or team to oversee the quality control process for each phase, from pre-application checks to final sign-off.
- Conduct Pre-Work Briefings: Before any work begins, hold a meeting with all relevant personnel to review the checklist, clarifying expectations and addressing any potential challenges.
- Document Everything: Use photographic evidence and detailed notes to document each checkpoint. This creates an invaluable project record for future reference and accountability.
- Partner with Experts: Collaborate with specialists who have a proven track record of internalizing these high standards. An expert partner can provide invaluable guidance and ensure flawless execution.
By embracing this structured and disciplined approach, you are not just managing a task; you are mastering a process. This mastery ensures that every project you undertake is a reflection of unwavering quality, setting a new standard for excellence and delivering results that are built to last.
Ready to ensure your next pavement marking project meets the highest standards of quality and compliance? The experts at Houston Parking Lot Striping build this meticulous construction quality control checklist into every project we undertake, delivering precision, durability, and peace of mind. Contact Houston Parking Lot Striping today to see how our commitment to quality can protect and enhance your property.