

Warehouse Floor Painting: The Ultimate Guide to Durable, Safe Floors
Painting a warehouse floor is about much more than just a fresh look. It's a strategic move that turns a basic concrete slab into a hard-working asset that boosts safety, efficiency, and the overall lifespan of your facility. By applying specialized coatings like epoxy or polyaspartic, you’re not just adding color; you're protecting the concrete, guiding your team, and meeting critical safety standards. A professionally coated floor is the bedrock of a safe and productive warehouse, and this guide will walk you through everything you need to know.
Why Warehouse Floor Painting Is a Critical Investment
It’s easy to write off floor painting as just another maintenance expense, but that’s a shortsighted view. Think of it as a core investment that pays real dividends in safety, operational smoothness, and the long-term health of your building. An unmarked, bare concrete floor is a blank canvas for accidents and inefficiency. A professionally coated surface, on the other hand, becomes an active part of your risk management and workflow.
This goes way beyond rolling on a coat of paint. We're talking about creating a tough, seamless surface built to handle the daily abuse from heavy forklifts, chemical spills, and constant foot traffic. A job done right is less about aesthetics and more about performance—and that performance directly impacts your bottom line by cutting down on accidents and protecting the building itself.
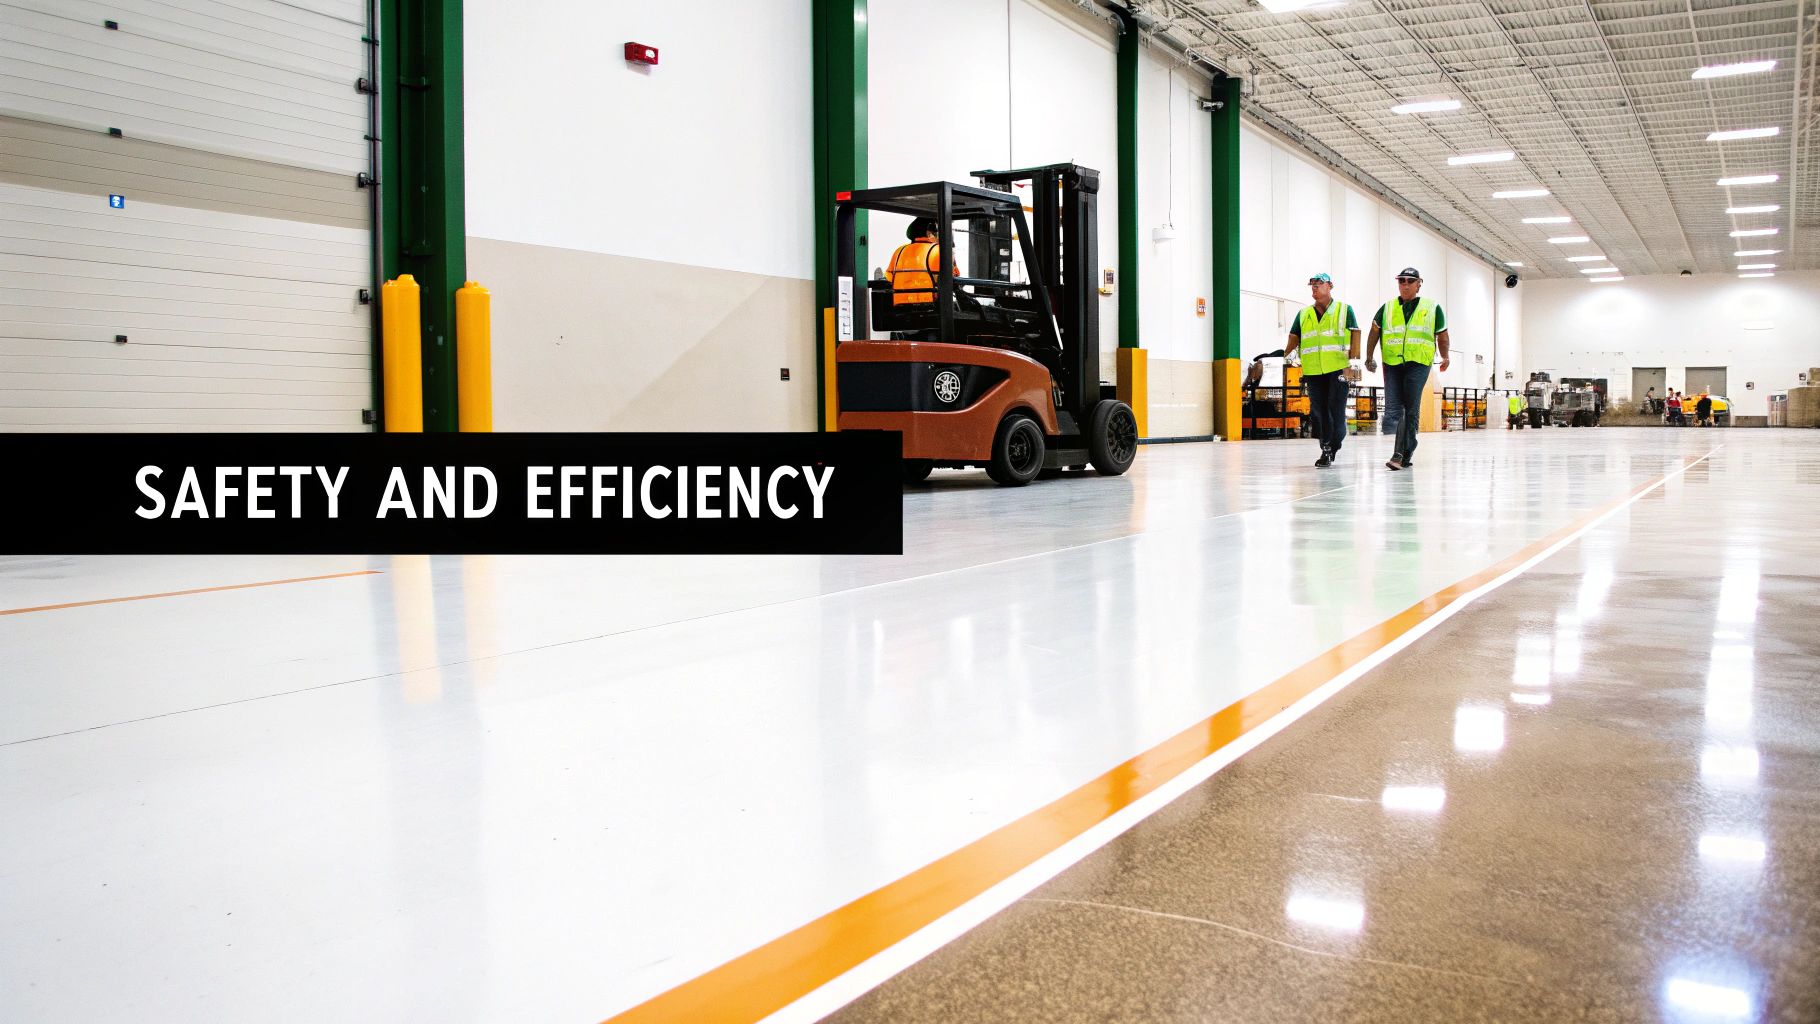
Enhancing Workplace Safety and Compliance
The most immediate payoff from a good floor coating is a huge leap in workplace safety. The high-gloss finish of modern coatings brightens up the whole facility by reflecting light, which improves visibility and can even cut down on your lighting bill. This simple change makes it much easier for everyone to spot potential hazards, leading to fewer incidents.
Beyond that, a properly marked floor is non-negotiable for meeting regulatory standards. Agencies like OSHA mandate clear markings to define different zones within a warehouse.
- Traffic Control: Bright, clear lines create dedicated lanes for forklifts and pedestrian walkways, which is crucial for preventing collisions in high-traffic areas.
- Hazard Identification: Using specific colors to mark off hazardous material storage, electrical panels, or low-clearance zones acts as a constant, silent warning.
- Safety Zones: Marking out clear spaces for fire extinguishers, first-aid kits, and eyewash stations ensures they’re never blocked and are easy to find in an emergency.
By turning your floor into a visual guide, you’re making the entire workspace more intuitive and safer for everyone. This isn’t just a nice-to-have; it’s a fundamental part of any serious safety program.
Boosting Operational Efficiency and Durability
A well-planned floor marking system just makes a warehouse run better. When forklift paths, pallet storage bays, and pedestrian zones are clearly defined, everything from inventory management to order picking becomes more organized. This visual clarity cuts down on confusion, saves time, and helps prevent costly mistakes.
But the benefits don't stop at organization. The right coating is like a suit of armor for your concrete. Bare concrete is porous, meaning it kicks up dust and is susceptible to cracks and stains. A high-performance epoxy or polyaspartic coating seals it off, creating a barrier that:
- Prevents Dusting: It locks in the fine concrete dust that can damage products and put a strain on your HVAC system.
- Resists Damage: The coating is tough enough to absorb impacts from dropped tools and heavy loads, preventing chips and cracks from forming in the slab below.
- Simplifies Maintenance: A smooth, non-porous surface is a breeze to clean. Spills from oil or chemicals wipe right up instead of soaking in, dramatically cutting down your cleaning time and costs.
In the end, painting your warehouse floor isn't just a maintenance chore; it’s a business decision. It's an investment in your team’s safety, your operational efficiency, and the longevity of your most important asset.
Choosing the Right Coating for Your Warehouse Floor
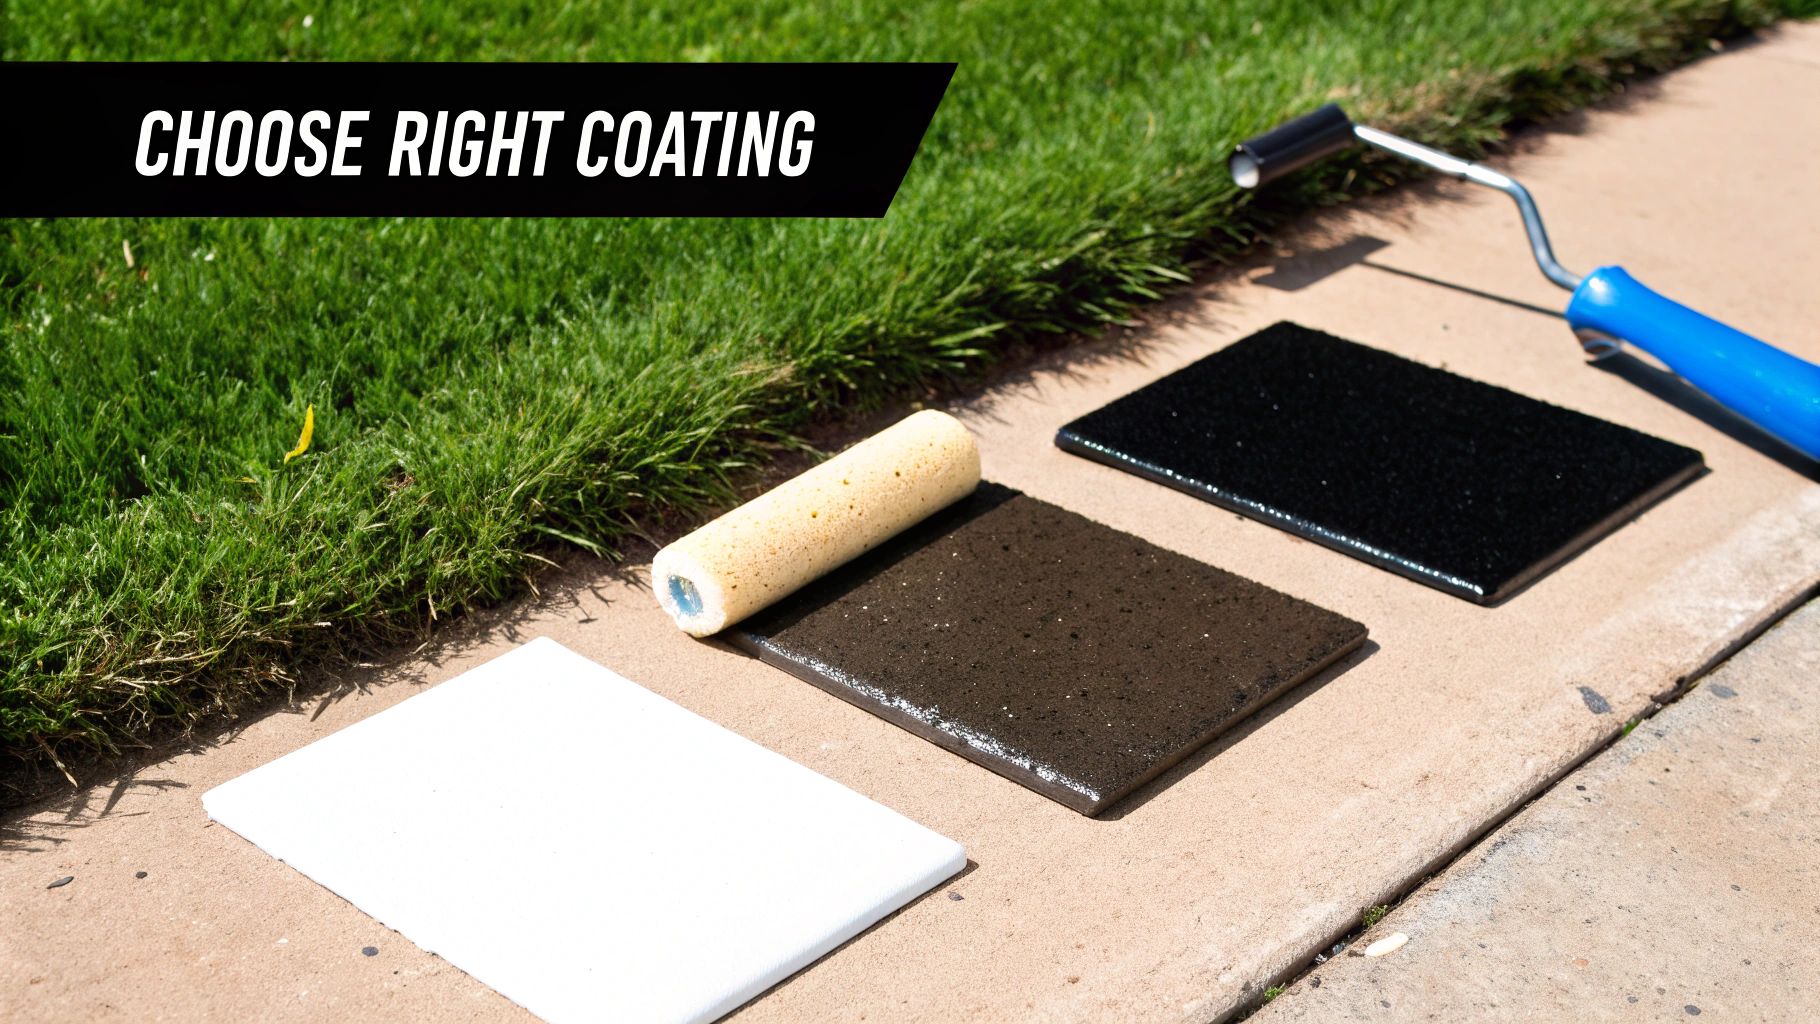
Picking the right material for your warehouse floor is a lot like choosing the right tires for a vehicle—the best option depends entirely on the terrain and the performance you need. A one-size-fits-all approach simply doesn't cut it. The unique demands of your facility, from the weight of your forklifts to potential chemical spills, will point you toward the ideal coating system.
This isn’t just about picking a color. It's about chemistry. Modern industrial coatings are complex systems engineered to handle specific stresses, and knowing the difference between them is key to making a smart investment.
Epoxy Coatings: The All-Around Workhorse
When most people picture a coated warehouse floor, they’re thinking of epoxy. It’s been the industry standard for decades, and for good reason. Think of epoxy as the durable, all-terrain tire of the flooring world—it's tough, reliable, and a great fit for a huge range of industrial settings. It cures into a thick, hard, high-gloss surface that stands up to constant foot traffic and the daily grind of pallet jacks and forklifts.
The numbers back this up. The global market for industrial floor coatings is projected to hit USD 4,734.9 million by 2027, a significant jump from USD 2,687.7 million in 2019. Epoxy is leading that charge, commanding over 40.7% of the market share because of its proven ability to protect concrete from heavy machinery and chemical exposure.
What makes epoxy so popular?
- High Compressive Strength: It can take a beating from heavy loads, which protects the concrete underneath from cracking and damage.
- Incredible Adhesion: When applied to a properly prepped surface, epoxy forms a tenacious chemical bond with the concrete, becoming a part of the floor itself.
- Cost-Effectiveness: For most applications, epoxy offers the best bang for your buck, balancing high performance with a manageable price point.
Polyaspartic Coatings: The Fast-Curing Specialist
If epoxy is the all-terrain tire, polyaspartic is the high-performance racing tire. Its superstar quality is its incredibly fast cure time. This makes it an absolute lifesaver for facilities that can't afford to shut down for long.
While an epoxy system might need 24 to 72 hours to be ready for heavy traffic, a polyaspartic coating can often be fully cured and back in service in just one day. That rapid return-to-service is a game-changer for 24/7 operations or any warehouse where every hour of downtime costs serious money.
Beyond speed, polyaspartics are also more flexible than epoxy, giving them better resistance to scratches and abrasions. They are also UV stable, which means they won’t turn yellow when exposed to sunlight—a perfect choice for floors near big loading dock doors.
Key Takeaway: The main reason to choose polyaspartic is speed. If getting your operations back online is the number one priority, this coating is worth the higher upfront cost.
Urethane Coatings: The Protective Topcoat
Urethane coatings play a more specialized role. It's best to think of urethane not as the tire itself, but as an ultra-durable, specialized tread you apply over the top. It's almost always used as a finishing coat over an epoxy base to add an extra shield against specific hazards. The application principles are similar to other tough industrial painting jobs, like those we cover in our guide to selecting parking lot paint.
Urethane’s superpowers are its chemical and abrasion resistance. It creates a barrier that stands up to harsh solvents, acids, and other corrosive materials that could eat through a standard epoxy floor. It also has fantastic thermal shock resistance, making it ideal for places with drastic temperature swings, like food processing plants that use hot-water washdowns.
While it doesn’t bond directly to concrete as well as epoxy does, urethane is an unbeatable final protective layer in a multi-coat system.
Comparison of Warehouse Floor Coating Systems
To make the choice clearer, here’s a side-by-side look at how these three main coating systems stack up. Each has a distinct profile, and seeing their strengths and weaknesses together can help pinpoint the right solution for your facility's specific needs.
| Coating Type | Key Benefit | Cure Time | Ideal Application | Cost Factor |
|---|---|---|---|---|
| Epoxy | Durability & Cost-Effectiveness | 24-72 hours | General manufacturing, warehouses, distribution centers | $$ |
| Polyaspartic | Fast Return-to-Service | 4-24 hours | 24/7 operations, food & beverage, cold storage | $$$$ |
| Urethane | Chemical & Abrasion Resistance | 12-48 hours | As a topcoat in labs, chemical plants, food processing | $$$ |
Ultimately, the best coating is often a combination. Many of the most durable warehouse floors use an epoxy base coat for its strength and adhesion, topped with a urethane coat for its superior resistance to chemicals and daily wear and tear.
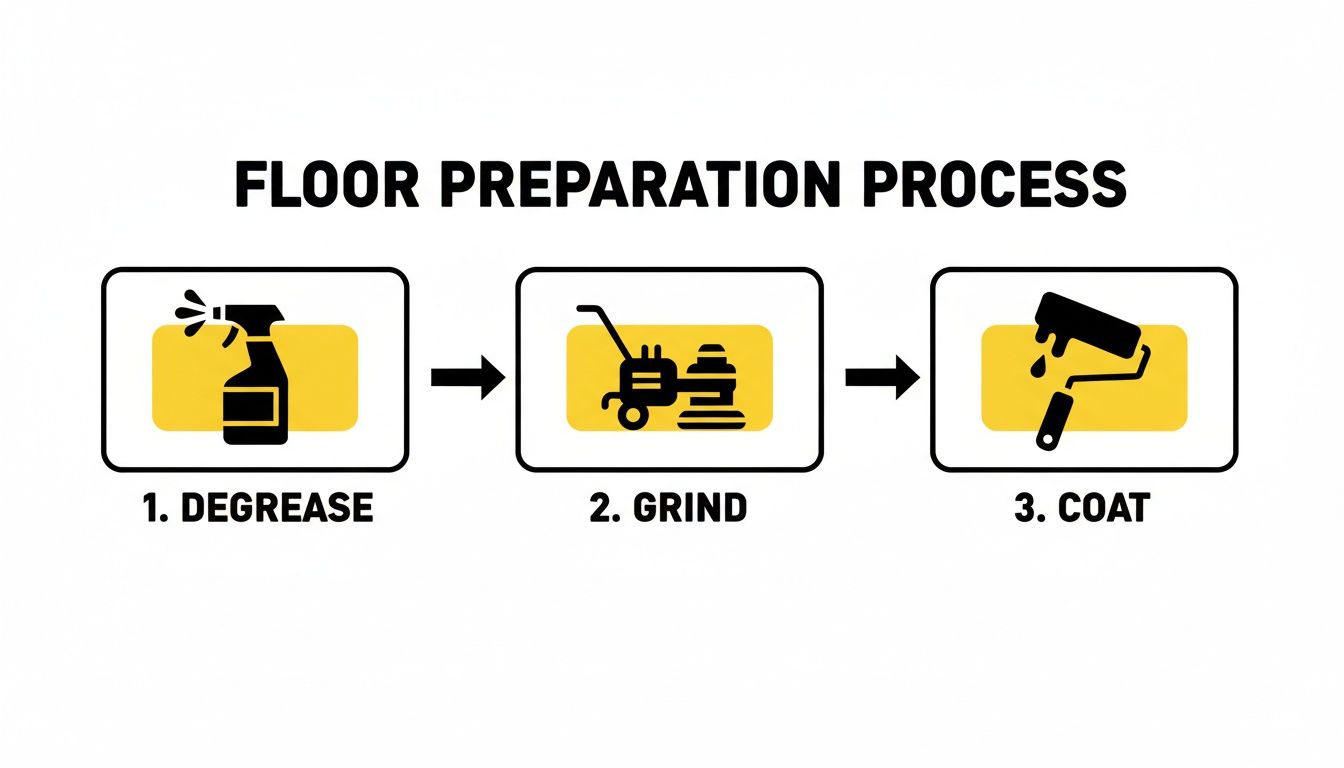
Surface Prep and Application: Getting It Right the First Time
If you want to know how well a warehouse floor coating job was done, don't look at it the day it's finished. Look at it a few years down the line. The real secret to a floor that lasts isn't in the final glossy coat; it’s in the hard work that happens long before a can of epoxy is even opened.
In my experience, a staggering 80% of all floor coating failures can be traced back to one thing: poor surface preparation. You simply can't get a lasting bond if the concrete underneath isn't ready to receive it.
More Than Just Cleaning: Creating the Perfect Profile
Think of bare concrete as a giant, porous sponge. Over the years, it soaks up everything—oil, grease, hydraulic fluid, you name it. The first step is always a deep, aggressive degreasing to pull all those contaminants out. If you paint over them, the coating will just lift and peel away. It's a guaranteed failure.
Once it's clean, we have to give the surface some "teeth." This isn’t a job for a quick acid wash; professional results demand mechanical profiling.
- Diamond Grinding: This is our go-to for most jobs. We use heavy machines with diamond-impregnated discs to grind off the top layer of concrete. It chews through old coatings, glues, and imperfections, leaving a clean, textured surface that’s perfect for the new coating to bite into.
- Shot Blasting: When we're dealing with thicker existing coatings or need a more aggressive profile, we bring in the shot blaster. This machine fires tiny steel beads at the floor at high velocity, basically stripping the surface and creating a rough, porous texture that provides an incredible mechanical grip.
A properly prepped floor should feel like medium-grit sandpaper. In the industry, we call this a Concrete Surface Profile (CSP) of 2-3. This texture is the key—it gives the coating millions of tiny anchor points to lock onto, ensuring it won't delaminate under the constant abuse of forklift traffic.
The Application: A Controlled Chemical Process
With the concrete perfectly prepped, it's time to apply the coating. This is where precision and timing are everything. This isn’t like rolling paint on a bedroom wall; we're managing a chemical reaction in real-time.
The demand for this kind of expertise is exploding. The industrial floor coatings market is on track to grow from USD 6.38 billion in 2025 to over USD 11.21 billion by 2035. It makes sense when you consider that global warehouse construction has jumped 45% in major markets since 2019. Operators need floors that can take a beating, and they're willing to invest in systems that last.
A professional application follows a strict sequence of steps:
- Detailing and Repairs: First, we address the imperfections. Any cracks, spalls, or divots are ground out and filled with a high-strength epoxy mortar. The goal is a perfectly seamless surface with no weak spots.
- The Primer Coat: Next, we apply a primer. This is a critical step that seals the porous concrete and acts as the foundational layer of adhesion. It also prevents a common problem called "outgassing," where air escaping the concrete creates bubbles and pinholes in the finish.
- Applying the Body Coat: Now comes the main event. We precisely mix the two-part coating (resin and hardener), which starts a chemical clock. We have a limited "pot life" to get it down before it starts to harden. The crew pours the mixture and uses squeegees to spread it, then immediately back-rolls it to ensure a perfectly uniform thickness. It’s an efficient, well-choreographed process.
- The Protective Topcoat: For maximum durability, a final topcoat of urethane or polyaspartic is often applied. This is the sacrificial layer—it adds incredible resistance to scratches, chemicals, and UV yellowing, protecting the entire system underneath.
Throughout this entire process, we’re constantly monitoring the environment. Temperature and humidity have to be within the manufacturer's sweet spot for the coating to cure properly. Sticking to a rigorous plan, just like the one detailed in a construction quality control checklist, is the only way to guarantee a flawless, long-lasting floor.
Navigating Safety Regulations for OSHA and ADA Compliance
Warehouse floor markings are much more than a fresh coat of paint. They’re a critical visual language, a set of on-the-ground instructions that keep your people and equipment safe. When you get it right, you create a predictable, orderly environment. Get it wrong, and you’re inviting chaos—and serious business risks.
Failing to meet the standards set by the Occupational Safety and Health Administration (OSHA) and the Americans with Disabilities Act (ADA) isn't an option. A professionally planned and executed floor coating and striping project is your best defense against accidents, operational chaos, and hefty fines. It’s about transforming a wide-open floor into an intuitive system where forklift paths and pedestrian walkways never dangerously intersect.
Understanding OSHA's Color-Coding System
OSHA's guidelines for floor markings are all about standardizing safety signals so they’re instantly understood in any industrial facility. While they don't lock in a single color for every possible use case, they've established a universal color-coding convention that every professional contractor should know by heart.
Think of it as the traffic signal system for your warehouse floor:
- Yellow: This is your go-to for defining traffic flow. It’s used to mark aisles, forklift paths, and specific work cells, creating clear travel lanes.
- Red: Instantly signals danger or a critical safety area. You’ll see red used to mark off zones around fire extinguishers, emergency stops, and hazardous material storage.
- White: Often designates the placement of equipment and fixtures that aren't directly safety-related, like workstations, carts, and storage racks.
- Blue, Green, or Black: These colors typically help with inventory management, marking areas for raw materials, works-in-progress, and finished goods.
Ignoring these conventions isn't just a minor slip-up. OSHA fines for non-compliance can run into the thousands of dollars for each violation. Worse, it creates a hazardous environment where the likelihood of accidents, injuries, and costly shutdowns skyrockets.
ADA Requirements for Accessible Pathways
OSHA is focused on occupational safety, but the ADA ensures your facility is accessible to everyone, including employees or visitors with disabilities. This means your floor markings have to account for clear and unobstructed movement.
A key rule is that pedestrian walkways must be a minimum of 36 inches wide to ensure clear passage. The entire goal of the ADA in this context is to create an "accessible route" that is free from any and all obstructions. Well-marked pathways and clear zones around doorways are non-negotiable. Many of the same principles of clear access apply indoors as they do outdoors, which you can learn more about in our guide to ADA handicap parking space requirements.
A compliant floor marking plan isn't just about avoiding fines. It is a proactive strategy that demonstrates a commitment to the safety and well-being of every person who enters your facility.
Before any of these crucial markings can even be applied, the floor itself has to be ready.
This foundational work—degreasing, grinding, and coating—is what ensures the safety lines painted on top will actually last. That's why working with a contractor who truly understands these interwoven regulations is so important. They won’t just make your floor look good; they’ll implement a marking strategy that protects your people, your assets, and your entire operation.
Understanding Project Timelines and Cost Factors
When you’re planning to get your warehouse floor coated, two questions always jump to the front of the line: "How long is this going to take?" and "What's it going to cost me?" Getting a real handle on what drives these answers is the key to setting a realistic budget and timeline, and it helps you properly vet the quotes you get from contractors.
The best projects strike a balance between getting the work done quickly to minimize downtime and making the right investment for a floor that will last for years.
Let's get one thing straight: the timeline is about much more than just the time spent rolling on the paint. The most critical part of the entire job—surface preparation—often takes up the bulk of the schedule. Think of it like building a house. You wouldn't rush the foundation, right? The same principle applies here. Every prep step is absolutely essential for the coating to grab onto the concrete and hold up under years of heavy traffic.
A Typical Project Timeline Breakdown
A professional warehouse floor coating job is a step-by-step process. If you skip a step or rush through it, the final product will suffer. While every warehouse floor has its own quirks, the general flow of a project is pretty consistent.
Phase 1: Consultation and Planning: This is where we start. A good contractor will walk the floor with you, assess its current condition, and talk through your daily operations. This is where you'll select the right coating system and map out a schedule that causes the least disruption to your business.
Phase 2: Surface Preparation: Here comes the heavy lifting. This phase involves deep cleaning, getting rid of any grease or oil, and then mechanically profiling the concrete. We use equipment like diamond grinders or shot blasters to create the perfect texture for the new coating to bond to. It's loud, it's dusty, but it's non-negotiable.
Phase 3: Coating Application: Once the prep is done, the crew will apply a primer, the main color or body coat, and often a protective topcoat. Each layer has to be applied under the right conditions and given the proper amount of time before the next one goes on.
Phase 4: Curing and Return to Service: This isn't just downtime; it’s when the science happens. The coating is undergoing a chemical reaction to harden into a durable, resilient surface. Cure times can vary, but generally, a floor is ready for light foot traffic in 24 hours. For heavy-duty use like forklifts, you'll need to wait 3-7 days for most standard epoxy systems.
Rushing the cure time is a recipe for disaster. Driving a forklift onto a floor before it's fully hardened can leave permanent tire marks, create deep gouges, and even cause the coating to peel away from the concrete. That forces you into costly repairs and even more downtime.
Key Factors That Influence Your Final Cost
Looking past a simple price per square foot reveals what really drives the cost of a project. The final number you see on a quote is a direct reflection of the labor, materials, and complexity needed to give you a floor that performs. It’s a significant investment because these floors play a vital role in keeping a facility safe and efficient.
The market for these coatings is huge, valued at USD 5.5 billion in 2023 and still growing. That growth is fueled by facilities realizing that modern coatings can boost floor durability by up to 300%, stretching the time between major repairs from every year to every 5-7 years. On top of that, these smooth, seamless surfaces can slash cleaning time by 40%, making them a smart operational investment. You can explore more details about the industrial floor coatings market to see just how big this industry is.
Here are the variables that will directly impact your quote:
Concrete Condition: A floor that's full of cracks, spalls, and oil stains is going to require a lot more prep work than a fresh, clean slab of concrete. That extra labor and material adds up.
Coating System: High-performance systems cost more. Fast-curing polyaspartics or highly chemical-resistant urethanes have a higher price tag than a standard, 100% solids epoxy.
Project Size: This one is pretty straightforward. While a larger warehouse will have a higher total cost, the price per square foot usually goes down as the project size increases.
Layout Complexity: A simple, wide-open space is one thing. A floor needing intricate line striping for pedestrian walkways, safety markings around machinery, and custom-stenciled logos requires a whole different level of time and precision, which is reflected in the cost.
Answering Your Top Warehouse Floor Painting Questions
Even with a solid plan, you're bound to have a few more specific questions. Let's tackle the most common ones we hear from facility managers to clear up any final details and help you move forward confidently.
How Long Will My Warehouse Operations Be Disrupted?
This is the million-dollar question for any facility manager. Minimizing downtime is everything. The honest answer is: it depends on your floor's size, its current condition, and the coating system you choose. A good contractor will work with you to create a phased plan, often scheduling the work over weekends or off-peak hours to keep your operations running as smoothly as possible.
If you absolutely need a fast return to service, fast-curing polyaspartic coatings are a game-changer. These systems can often handle foot traffic in just 4-6 hours and are ready for heavy forklift traffic within 24 hours. That's a massive improvement over traditional epoxies, which might keep your floor out of commission for 24 to 72 hours.
Can You Paint Over an Existing Old Floor Coating?
This is a big one, and the answer is a firm "maybe." It all comes down to the integrity of the existing coating. If the old layer is peeling, chipping, or flaking off, it absolutely has to go. Painting over an unstable surface is like building a house on a shaky foundation—the new coating is destined to fail right along with the old one underneath.
On the other hand, if the current coating is still firmly bonded to the concrete and is compatible with the new system, it might be possible to simply abrade (or scuff) the surface and apply the new coat. This is where a professional assessment is non-negotiable. Only an expert can determine the right approach for a durable, long-lasting finish.
Expert Insight: Be very wary of any contractor who suggests they can just paint over a failing floor without intensive prep. True value comes from creating a powerful bond with the concrete itself, and that almost always means getting rid of the old, compromised coating first.
What Is the Difference Between Floor Paint and a Floor Coating?
This isn't just semantics; it's a critical distinction for an industrial environment. "Floor paint" is typically what you'd find at a hardware store—a single-component product like a latex or oil-based paint. It just dries on the surface, forming a thin film that offers very little protection against the realities of a warehouse, like abrasion and chemical spills.
A "floor coating," like an epoxy or polyaspartic, is in a completely different league. These are two-part resin systems. When mixed, a chemical reaction creates a thick, hard, incredibly durable surface that chemically bonds to the concrete. This gives you far superior resistance to impact, chemicals, and wear and tear, making coatings the only real choice for a high-traffic warehouse.
How Do I Maintain My New Coated Warehouse Floor?
Protecting your investment is all about smart, simple maintenance. The best thing you can do is run a regular cleaning schedule. Using a pH-neutral cleaner with an auto-scrubber or mop will keep the floor in top shape. Just as important is cleaning up any spills immediately to prevent staining or chemical damage.
It's also a great idea to set up a routine inspection. A quick weekly walkthrough can help you spot small issues, like a deep scratch or a chip, before they become big problems that compromise a larger section of your floor. Your contractor should provide you with a detailed maintenance guide tailored to your specific coating system to ensure it performs for years to come.
Ready to turn your warehouse floor into a safe, durable, and productive asset? Contact Houston Parking Lot Striping today for a free, no-obligation estimate. Our team has the hands-on experience to deliver a high-performance floor coating and striping solution that fits your operational needs and exceeds your expectations. Get Your Free Quote Now.